/* Mostly about Oracle APEX, ORDS, PL/SQL and a bit of Linux in between */
ORDS: Document your API using the OpenAPI Specs and Swagger
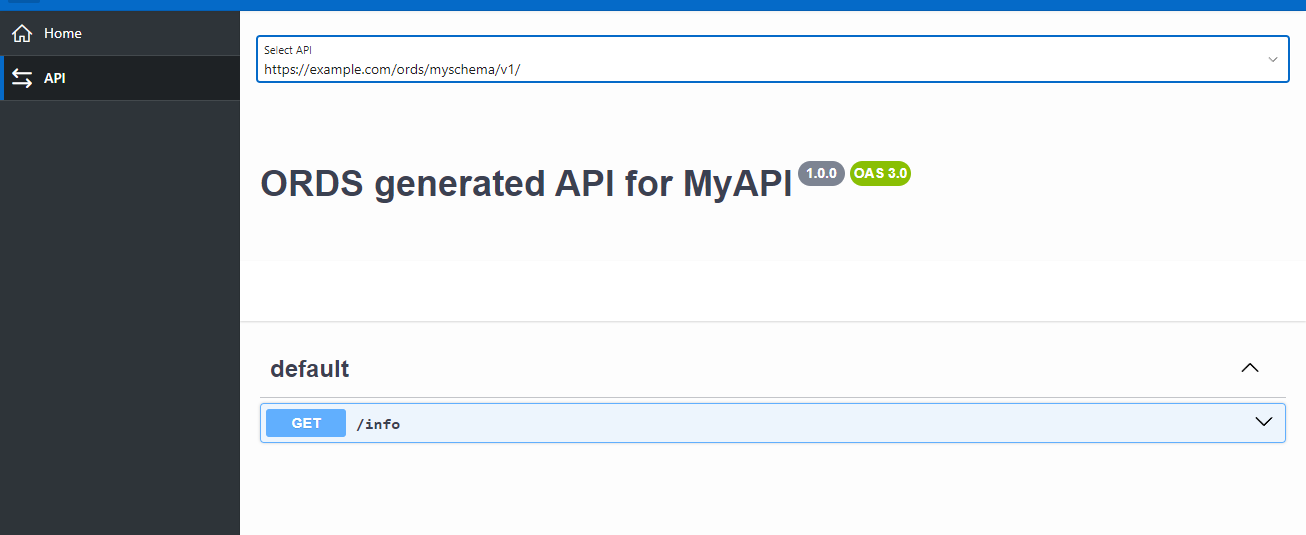
In this blog post I would like to show how you can integrate the Swagger UI into an APEX application to document your ORDS RESTful API endpoints. We will consume the OpenAPI specification auto-generated by ORDS, or a customized spec file if provided, and create a separate APEX Page Template for Swagger.
OpenAPI specification
A very useful, but not highly known feature of ORDS is the auto-generated OpenAPI specification for each endpoint you have defined in your ORDS RESTful Services. The JSON can be used to display the API definition in the Swagger UI. The URL syntax of the ORDS auto-generated OpenAPI definition of your endpoints is:
# Example
http://example.com/ords/myschema/open-api-catalog/v1/
└──────────┬──────┘└─┬┘└───┬────┘└──────┬───────┘└─┬┘
│ │ │ │ │
│ │ │ │ └ Module Base Path (URI Prefix)
│ │ │ │
│ │ │ └ Static Path for OpenAPI Catalog
│ │ │
│ │ └ Schema Alias (URL Mapping Pattern)
│ │
│ └ ORDS Alias (ORDS Path)
│
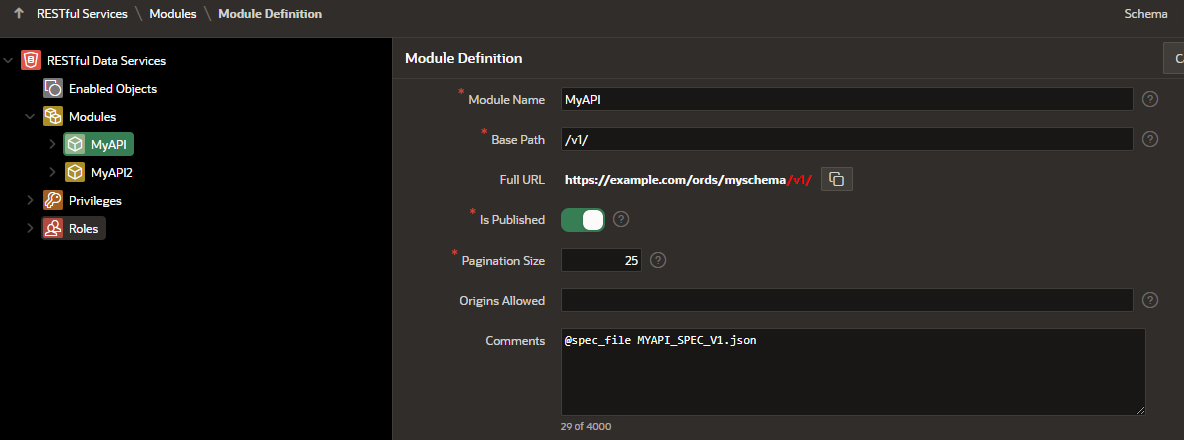
└ Server URLIn my demo APEX application, it will be possible to document the APIs using the default OpenAPI specification created by ORDS, or by using a self-created API definition JSON file. To design and document your APIs, you can use an editor tool like Stoplight Studio. In this case, you can upload your JSON file as a Static Application File to the APEX application. On the API module level of ORDS, you can define if your own JSON file should be taken for the Swagger UI by inserting @spec_file {myOwnAPISpec.json} into the Comment text field. If no file is specified, the default specification will be used.
You can use the following SQL query to display all your ORDS RESTful API modules that are linked to the current schema you are logged into, including the direct call URL and the URL to retrieve the OpenAPI specification JSON (auto-generated by ORDS or your own shipped spec file, if specified).
Note: The SQL statement will consume the function APEX_MAIL.get_instance_url() to return the Server Host URL of your APEX instance. To get the correct URL, the Instance URL needs to be set in the APEX INTERNAL Workspace under Manage Instance > Instance Settings > Email > Oracle APEX Instance URL. You can define a static value or use other functions instead, like APEX_UTIL.host_url, but those are dependent on an existing HTTP context in the session to return a value.
select
   ords_mod.id as service_module_id,
   ords_mod.name as service_module_name,
   app.application_id,
   app.application_name,
   APEX_MAIL.get_instance_url || ords_schema.pattern || ords_mod.uri_prefix as ords_module_direct_url,
   APEX_MAIL.get_instance_url ||
     case
       when spec.application_file_id is not null then
         lower(ws.path_prefix) || '/r/' || app.application_id || '/files/static/v' || app.files_version || '/' || spec.file_name
       else
         ords_schema.pattern || '/open-api-catalog' || ords_mod.uri_prefix
     end
   as openapi_spec_direct_url
from apex_applications app
join apex_workspaces ws on app.workspace = ws.workspace
join user_ords_schemas ords_schema on app.owner = ords_schema.parsing_schema
join user_ords_modules ords_mod on ords_schema.id = ords_mod.schema_id
left join apex_application_static_files spec on app.application_id = spec.application_id and regexp_substr(ords_mod.comments, '^@spec_file[[:space:]]+(.*?)$', 1, 1, 'i', 1) = spec.file_name
where ords_mod.name != 'oracle.example.hr' and ords_mod.status = 'PUBLISHED'
Create a new APEX Page Template
To integrate the Swagger UI into your APEX application, we first need to download the JavaScript and CSS dependencies from GitHub. You can upload them to your Workspace as Static Application Files in the Shared Components of your APEX app.
- swagger-ui-standalone-preset.js
https://github.com/swagger-api/swagger-ui/blob/master/dist/swagger-ui-standalone-preset.js - swagger-ui-bundle.js
https://github.com/swagger-api/swagger-ui/blob/master/dist/swagger-ui-bundle.js - swagger-ui.css
https://github.com/swagger-api/swagger-ui/blob/master/dist/swagger-ui.css
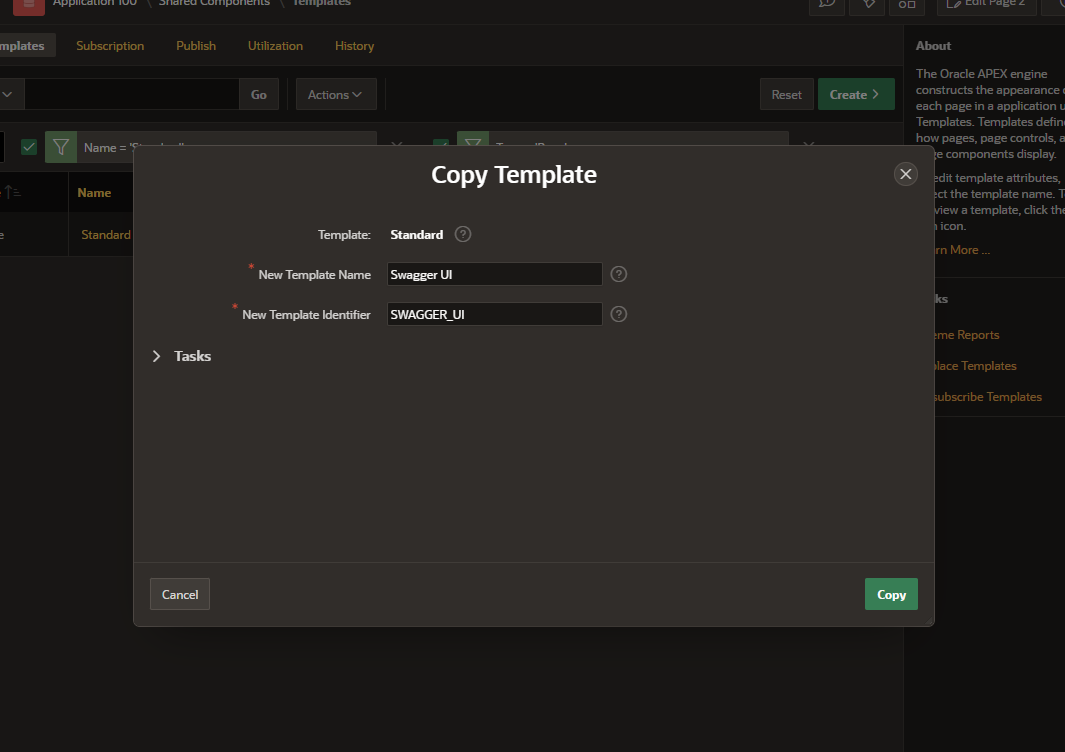
Next, we need to create a new Page Template in the APEX application. It will be based on the Standard Page Template of APEX. Inside the Shared Components, navigate through User Interface > Templates. In the following report, search for “Page” as Type and “Standard” as Name. Click on the icon inside the “Copy” column and define “Swagger UI” as the New Template Name. Afterwards, you can click on the button Copy.
We need to adapt the template a bit. Most of the HTML sub-templates will stay the same. The major difference is that the substitution strings for the form element (#FORM_OPEN# and #FORM_CLOSE#) will be removed from the Header and Footer template and moved both inside the Body template. This is necessary to avoid conflicts with the Swagger JavaScript.
Paste the following HTML content inside the Header template definition:
<!DOCTYPE html>
<html class="no-js #RTL_CLASS# page-&APP_PAGE_ID. app-&APP_ALIAS." lang="&BROWSER_LANGUAGE." #TEXT_DIRECTION#>
<head>
  <meta http-equiv="x-ua-compatible" content="IE=edge" />
  <meta charset="utf-8">
  <title>#TITLE#</title>
  #APEX_CSS#
  #THEME_CSS#
  #TEMPLATE_CSS#
  #THEME_STYLE_CSS#
  #APPLICATION_CSS#
  #PAGE_CSS#
  #FAVICONS#
  #HEAD#
  <meta name="viewport" content="width=device-width, initial-scale=1.0" />
</head>
<body class="t-PageBody t-PageBody--hideLeft t-PageBody--hideActions no-anim t-PageTemplate--standard #PAGE_CSS_CLASSES#" #TEXT_DIRECTION# #ONLOAD# id="t_PageBody">
<a href="#main" id="t_Body_skipToContent">&APP_TEXT$UI_PAGE_SKIP_TO_CONTENT.</a>
<header class="t-Header" id="t_Header" role="banner">
  #REGION_POSITION_07#
  <div class="t-Header-branding">
    <div class="t-Header-controls">
      <button class="t-Button t-Button--icon t-Button--header t-Button--headerTree" aria-label="&"APP_TEXT$APEX.TEMPLATE.MAIN_NAV_LABEL"." title="&"APP_TEXT$APEX.TEMPLATE.MAIN_NAV_LABEL"." id="t_Button_navControl" type="button"><span class="t-Header-controlsIcon" aria-hidden="true"></span></button>
    </div>
    <div class="t-Header-logo">
      <a href="#HOME_LINK#" class="t-Header-logo-link">#LOGO#</a>
      #AFTER_LOGO#
    </div>
    <div class="t-Header-navBar">
      <div class="t-Header-navBar--start">#BEFORE_NAVIGATION_BAR#</div>
      <div class="t-Header-navBar--center">#NAVIGATION_BAR#</div>
      <div class="t-Header-navBar--end">#AFTER_NAVIGATION_BAR#</div>
    </div>
  </div>
  <div class="t-Header-nav">#TOP_GLOBAL_NAVIGATION_LIST##REGION_POSITION_06#</div>
</header>
The Body template will includes a <div> container with identifier “swagger-ui” that will be used to hold our Swagger UI contents later on:
<div class="t-Body">
  #SIDE_GLOBAL_NAVIGATION_LIST#
  <div class="t-Body-main">
    <div class="t-Body-title" id="t_Body_title">#REGION_POSITION_01#</div>
    <div class="t-Body-content" id="t_Body_content">
      <main id="main" class="t-Body-mainContent">
        #SUCCESS_MESSAGE##NOTIFICATION_MESSAGE##GLOBAL_NOTIFICATION#
        #FORM_OPEN#
        <div class="t-Body-fullContent">#REGION_POSITION_08#</div>
        <div class="t-Body-contentInner">#BODY#</div>
        #FORM_CLOSE#
        <div id="swagger-ui"></div>
      </main>
      <footer class="t-Footer" id="t_Footer" role="contentinfo">
        <div class="t-Footer-body">
          <div class="t-Footer-content">#REGION_POSITION_05#</div>
          <div class="t-Footer-apex">
            <div class="t-Footer-version">#APP_VERSION#</div>
            <div class="t-Footer-customize">#CUSTOMIZE#</div>
            #BUILT_WITH_LOVE_USING_APEX#
          </div>
        </div>
        <div class="t-Footer-top">
          <a href="#top" class="t-Footer-topButton" id="t_Footer_topButton" title="&"APP_TEXT$APEX.UI.BACK_TO_TOP"." aria-label="&"APP_TEXT$APEX.UI.BACK_TO_TOP"."><span class="a-Icon icon-up-chevron" aria-hidden="true"></span></a>
        </div>
      </footer>
    </div>
  </div>
</div>
<div class="t-Body-inlineDialogs" id="t_Body_inlineDialogs">#REGION_POSITION_04#</div>
The Footer template will include:
#DEVELOPER_TOOLBAR#
#APEX_JAVASCRIPT#
#GENERATED_CSS#
#THEME_JAVASCRIPT#
#TEMPLATE_JAVASCRIPT#
#APPLICATION_JAVASCRIPT#
#PAGE_JAVASCRIPT#
#GENERATED_JAVASCRIPT#
</body>
</html>
As JavaScript > File URLs, reference the files we have uploaded as Static Application Files before:
#APP_FILES#swagger-ui-standalone-preset.js
#APP_FILES#swagger-ui-bundle.js
Inside the textarea for Function and Global Variable Declaration, enter the following:
var openApiSpecUrl = $v('P' + $v('pFlowStepId') + '_OPENAPI_SPEC_URL');
var moduleDirectUrl = $v('P' + $v('pFlowStepId') + '_DIRECT_URL');
As Execute when Page Loads, enter the following JavaScript code:
apex.theme42.initializePage.noSideCol();

$.getJSON(decodeURIComponent(openApiSpecUrl), function (data) {

  // Add the direct full URL and remove any other server, if existing
  if (!data.hasOwnProperty("servers")) {
    data.servers = [{"url": moduleDirectUrl}];
  } else if(data.servers.length === 0) {
    data.servers.push({"url": moduleDirectUrl});
  } else {
    for (var el in data.servers){
      if (el == 0){
        data.servers[el]['url'] = moduleDirectUrl;
      } else {
        delete data.servers[el];
      }
    }
  }

  // Build Swagger UI with options
  SwaggerUIBundle({
    spec: data,
    dom_id: '#swagger-ui',
    presets: [
      SwaggerUIBundle.presets.apis,
      SwaggerUIStandalonePreset
    ],
    layout: "BaseLayout",
    validatorUrl: null,
    defaultModelsExpandDepth: 0
  });

});
Reference the CSS file of Swagger in Cascading Style Sheet > File URLs:
#APP_FILES#swagger-ui.cssLast but not least, add a short custom CSS definition as Inline that applies to the <form> element on the page. It will overwrite the default definition that is not needed for our new Page Template. Additionally, the servers list drop-down can be hidden, because the URL will be automatically determined.
form#wwvFlowForm {
    min-height: unset !important;
}
.schemes-server-container {
    display: none !important;
}
All other settings do not need to be adjusted.
Create an APEX Page based on the new Page Template
Create a new APEX page and select “Blank Page” as its Type. In my example, I have used 2 as Page ID and “API” as its Page name. Next, in the Page Designer, select “Swagger UI” as the Page Template.
Create a new Static Content region “Select Module” with “Blank with Attributes” as its Template (region setting “Appearance”).
Create a page item P2_MODULE_ID of Type “Select List”. As Label you can define “Select API”. For Settings > Page Action on Selection, choose “Submit Page“. As the Source of the List of Values, select option “SQL Query” as “Type” with the following query:
select
  APEX_UTIL.host_url('APEX_PATH') || s.pattern || m.uri_prefix as d,
  m.id as r
from user_ords_modules m
join user_ords_schemas s on m.schema_id = s.id
where m.status = 'PUBLISHED'
order by m.name;
Next on, create a second page item P2_DIRECT_URL. It will be used to define the Full URL including the Base Path. Change its Type to “hidden“, the Source Type to “SQL Query (return single value)” with the following SQL statement as its Source:
select
APEX_UTIL.host_url('APEX_PATH') || s.pattern || m.uri_prefix
from user_ords_modules m
join user_ords_schemas s on m.schema_id = s.id
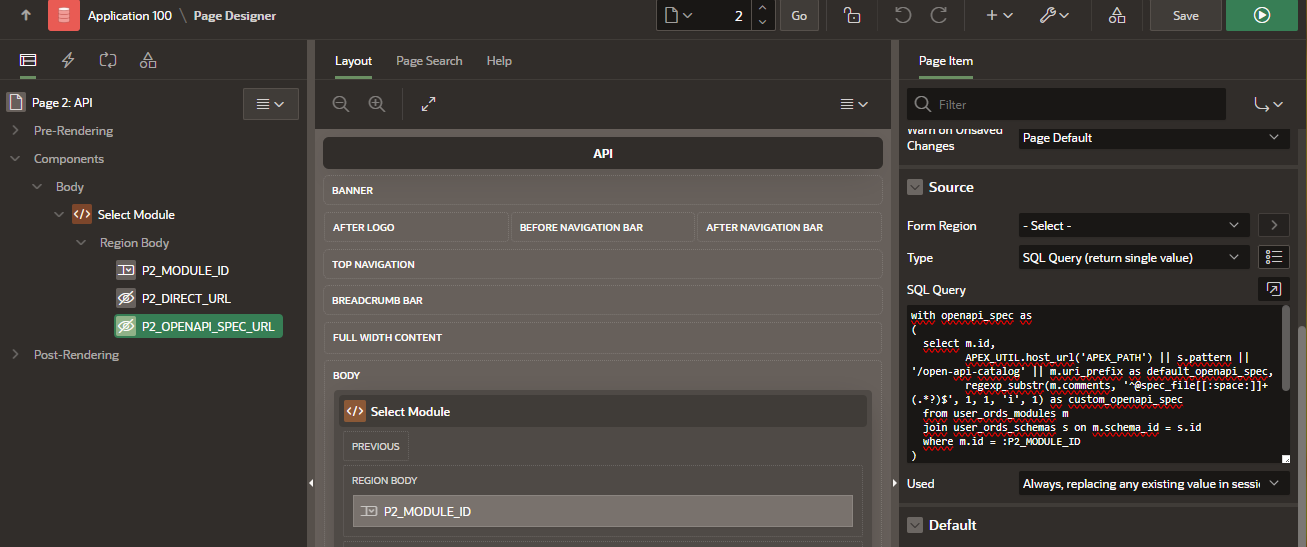
where m.id = :P2_MODULE_ID;The third page item P2_OPENAPI_SPEC_URL will hold the URL to the OpenAPI JSON specification. Set the Type to “hidden” and enter the following SQL Query as Source for “SQL Query (return single value)“:
with openapi_spec as
(
  select
    m.id,
    APEX_UTIL.host_url('APEX_PATH') || s.pattern || '/open-api-catalog' || m.uri_prefix as default_openapi_spec,
    regexp_substr(m.comments, '^@spec_file[[:space:]]+(.*?)$', 1, 1, 'i', 1) as custom_openapi_spec
  from user_ords_modules m
  join user_ords_schemas s on m.schema_id = s.id
  where m.id = :P2_MODULE_ID
)
select
  case when custom_openapi_spec is null
  then
     default_openapi_spec
  else
     '#APP_FILES#' || custom_openapi_spec
  end as spec_url
from openapi_spec;
For both hidden items (P2_DIRECT_URL and P2_OPENAPI_SPEC_URL), select for attribute “Used” the option “Always, replacing any existing value in session state“.
That’s all! When running the new APEX page, the user can choose between all ORDS modules (APIs) that are linked to the owner of the APEX application and run specific endpoints.