Maurice Wilhelm
/* Mostly about Oracle APEX, ORDS, PL/SQL and a bit of Linux in between */
Setup GitLab Runners and Container Registry for CI/CD with SQLcl Projects (Part 1)
With the release of SQLcl 24.3.0, Oracle has introduced a new feature called “SQLcl Projects”, which allows you to export incremental changes to database objects, Oracle APEX applications and ORDS modules, and deploy them to database schemas using Liquibase changesets. To streamline this process, I created a CI/CD utility framework for SQLcl Project deployments with name ESQUPRO that can be used in GitLab pipelines. In this blog series, I would like to share my ideas and experiences gained whilst implementing this functionality. We will create our own Docker image (based on Oracle’s SQLcl image) and save it in GitLab’s Container Registry.
The second issue of Red Stack Magazine, released on May 8 and focused on APEX Development, included an article I wrote on this subject titled “Mit SQLcl und GitLab-Pipelines den CI/CD-Prozess optimieren” (de). You can access the article here: https://my.doag.org/magazines/id.231.ab-sofort-verfuegbar-red-stack-magazin-nr-2-2026/.
CI/CD workflow with SQLcl Projects
With SQLcl Projects, changes to database objects can be versioned incrementally and within a predefined structure based on a Git repository. To achieve this, you first need to create an SQLcl project inside a Git repository using the project init command. The directory structure will look like as follows:
- .dbtools
- dist
- src
Configuration files will be placed in the “.dbtools” directory. These include, for example, project‑related settings (such as the project name or the default Git branch) as well as filter definitions (e.g., WHERE clauses used during export operations).
When using project export, database object definitions are written as SQL files to the “src” directory. The DDL is generated using DBMS_METADATA, ensuring that the exported objects reflect their state in the DEV environment. These exports must be performed in a sub‑branch of the branch defined as “defaultBranch” in the project configuration. This allows SQLcl to detect incremental changes when the project stage command is executed. Internally, SQLcl uses JGit to compare the contents of the “src” directory between the feature branch and the default branch (via a git diff). This automatically generates Liquibase changesets for the deltas and saves them in the “next” folder within “dist”. Finally, the sub-branch is merged back into the original branch.
Before releasing a new application version, project release can be used to finalize the changesets in “dist/next” and move them into a dedicated version directory (for example, dist/v1.0). This keeps versions cleanly separated and allows them to be deployed one by one at a later time.
A release rollout consists of the commands project gen-artifact and project deploy. The former creates a compact ZIP archive of the dist directory, which is then processed by SQLcl during the deploy step and applied to a target database schema. This deployment is executed via the included install.sql script, which triggers the required Liquibase command (lb update).
Setup GitLab Runner and Container Registry
CI/CD pipelines are executed using the GitLab Runner, which acts as an agent for executing jobs. The available “executors” – a specific type of runtime environment – include the Shell Executor for running jobs on the host system, the Docker Executor for execution within a virtual container, and a Custom Executor. Docker is a strong choice for CI/CD pipelines built around SQLcl projects. A GitLab Runner can not only use Docker images, but also build and push them to the GitLab Container Registry (or any external registry).
The Container Registry is disabled by default and the Runner not part of the core GitLab installation, so we need to install and configure them manually. While the Runner image can be obtained from the official Docker repository (gitlab/gitlab-runner), the Container Registry can be enabled inside the GitLab configuration file when it is installed via Omnibus. For a bare‑metal installation, at least the following options must be configured in the gitlab.rb file:
# /etc/gitlab/gitlab.rb

registry['enable'] = true
registry_external_url 'https://registry.domain.tld'
gitlab_rails['registry_enabled'] = true # for GitLab Token Auth against registryThe changes can then be applied using sudo gitlab-ctl reconfigure.
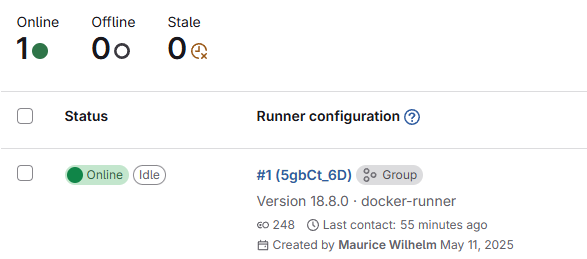
Individual runners must be registered as instance‑, group- or project‑level runners via the GitLab web UI. This process generates an authentication token, which must be provided when registering a new runner. There are two ways to create a new runner: you can either register it manually by running the gitlab‑runner register command inside the runner container, or you can define all required settings directly in the config.toml file. The following configuration serves as an example:
# /etc/gitlab-runner/config.toml

concurrent = 1
check_interval = 0
connection_max_age = "15m0s"
shutdown_timeout = 0

[session_server]
  session_timeout = 1800

[[runners]]
  name = "docker-runner"
  url = "https://git.domain.tld/"
  id = 1
  token = "glrt-<token>" # GitLab Runner Authentication Token
  token_obtained_at = 2026-05-14T00:00:00Z
  token_expires_at = 0001-01-01T00:00:00Z
  executor = "docker"
  [runners.custom_build_dir]
  [runners.cache]
    MaxUploadedArchiveSize = 0
    [runners.cache.s3]
    [runners.cache.gcs]
    [runners.cache.azure]
  [runners.docker]
    image = "alpine:latest"
    privileged = false
    disable_entrypoint_overwrite = false
    oom_kill_disable = false
    disable_cache = false
    volumes = ["/var/run/docker.sock:/var/run/docker.sock", "/cache"]
    shm_size = 0
network_mtu = 0Next, the GitLab Runner can be created as a Docker container as follows. It will automatically register our “docker-runner” as well.
docker run -v /etc/gitlab-runner:/etc/gitlab-runner -v /var/run/docker.sock:/var/run/docker.sock \
--restart=always \
--detach \
--name gitlab-runner \
gitlab/gitlab-runner:alpineAfter registration, the GitLab Runner starts communicating with GitLab by polling the GitLab API for jobs.
In the second part of this blog series, I’ll explain how to create GitLab CI/CD pipeline templates and use the Container Registry to store our own Docker image.
DOAG 2025: Optimize the CI/CD process with SQLcl and GitLab pipelines

With the release of version 24.3 of SQLcl, Oracle has introduced a new feature that supports automated Continuous Integration and Continuous Delivery (CI/CD). The Liquibase extension, integrated since SQLcl version 19.2, has already allowed developers to deploy database structures as well as SQL and PL/SQL code using custom changesets.
Now, things get even better: the new SQLcl Projects feature can automatically export database objects and generate incremental easy-to-read SQL based changesets for you. This makes it possible to reduce the manual effort in CI/CD workflows, speed up development processes, and minimize versioning errors.
I’m excited to be speaking at this year’s DOAG 2025 conference in Nuremberg! In my talk about the topic “Optimize the CI/CD process with SQLcl and GitLab pipelines” I will dive into how the new SQLcl feature can be used to speed up your application deployments. I will demonstrate a way how to integrate the new functionality into a GitLab CI/CD pipeline and control it over GitLab’s API – enabling near-seamless and fully automated deployments for database-driven applications. The pipeline uses a custom Docker image and a Bash script to apply modifications to the deployed files. This setup provides a flexible and configurable deployment process tailored to the specific needs of different environments.
To wrap up, the session will address the key challenges encountered during implementation and present a method for controlling the CI pipeline through the GitLab API using an APEX application. While the talk is aimed primarily at DevOps engineers, it’s also suitable for developers and anyone interested in CI/CD and database deployment automation.
The following components and features are included in the setup and will be addressed in my talk:
- A custom Docker image
Built specifically for SQLcl Projects to ensure a consistent and portable execution environment - A Bash script
Controls the workflow and defines which CI/CD steps to process, including:- Re-compile and checking for errors on stored user objects before export and after deployments
- Running utPLSQL tests before export and after deployments to QA environment
- CODESCAN for SQL, PLS and PLB files for Best Practice violations (based on Trivadis Coding Guidelines) after export
- Scanning log files for error patterns (including support to exclude specific error codes and mark them as a warning) and highlight matches in the log file
- Automated creation of repository assets based on pre-defined templates (e.g., README file, Liquibase property files, SQLcl Projects configuration)
- … and more
- GitLab configuration
Covers configurations needed on GitLab projects, e.g.- GitLab Runner setup
- GitLab Container Registry (or external)
- CI pipeline template (centralised and reusable, but customizable per GitLab project)
- Dockerfile
- CI/CD variables
- SSH Keys, Access Tokens
- API Webhook token (for ORDS)
- Database
Includes creation of the deployment schema and configurations needed to retrieve job event updates from GitLab - Deployment user
- ORDS API definition
- APEX application
Although the session will be held in German, I intend to share a small blog series here (in English) after the conference has taken place.
If you happen to be there, I’d be happy to see you in the audience!
Optimizing URL Generation with APEX_UTIL.prepare_url: A Reliable URL Strategy for Oracle APEX
When working with Oracle APEX, the syntax of generating links via APEX_UTIL.prepare_url is dependent on the app session and whether Friendly URLs are enabled or not. Based on the session context, the function will generate absolute or relative URLs. These differences become apparent, for example, when prepare_url is called from outside your own APEX application, e.g. via a Scheduler Job. In this post, I’ll walk you through a robust PL/SQL solution that ensures reliable, absolute URLs regardless of the execution context — and explain why understanding this nuance is crucial for predictable link behavior.
When generating a link to an Oracle APEX page — such as for use in an email — it’s essential to ensure that the link includes the full, absolute web address. APEX offers two functions for this: APEX_PAGE.get_url and APEX_UTIL.prepare_url. In my example, I will consume APEX_UTIL.prepare_url to make it possible to rejoin sessions and create links with different types of checksums included. You will need to configure some options on application and page level (e.g. Page Access Protection and Session Management) to use checksums and to allow users to rejoin sessions.
Recently, I stumbled on a little challenge: sending emails including links to my APEX applications using different proxy domains. Since my app is deployed across multiple customers – each with their own APEX workspace and custom proxy domain – I needed to generate custom links. By using the proxy domains, customers can only access their APEX apps but not the ORDS Landingpage and APEX Workspace Login. On the other hand, the direct APEX instance URL provides access to all resources and can only be used by developers. The goal was to generate the link and consider both URLs depending on the purpose the link is created. Another problem was that the link generation should work in every context (inside and outside of an HTTP context). Since prepare_url does only return an absolute link that includes the server’s host address (FQDN) in case Friendly URLs are enabled in the APEX application and we are not within an HTTP context, it was necessary to modify the link and add the domain after APEX had generated it, in case it was missing.
To add a bit of flexibility and keep things dynamic, I went with the following approach:
- To be able to generate a link with checksum, we need an active APEX session. If no session exists in the current execution context yet, we create one.
- Take a customer-specific proxy domain saved in a database table; if it does not exist (e.g. for developers), take the Oracle APEX instance URL (APEX_MAIL.get_instance_url) as fallback.
- If a relative URL is generated (starting with the SCRIPT_NAME path), we add the proxy or APEX instance URL to the link.
In my example, I have saved the proxy URLs in a table named “customer_proxies”. You need to include the SCRIPT_NAME path (“APEX_PATH”) for the proxy (e.g. https://customer1.example.com/ords/) as well as for the APEX instance (e.g. https://apex.example.com:8443/ords/) as well. With a proxy, the correct URL that needs to be saved depends on any rewrite rules you have defined on the proxy, so custom adjustments of the code below may be necessary. The Oracle APEX instance URL is a static value and needs to be set in the APEX internal workspace (instance admin) under Manage Instance > Instance Settings > Email > Oracle APEX Instance URL.
It’s important to note that the syntax of the resulting URL depends on the Friendly URLs setting of the APEX application in whose session context we are in. If you are in a session of an app with Friendly URLs activated, APEX will always generate a Friendly URL for you.
/** generates a fully qualified link to an APEX page with page items and checksum included
 *   @param pi_app_id specifies the app id
 *   @param pi_app_page_id specifies the app page id
 *   @param pi_app_user specifies the app user to be taken in case no APEX session exists yet
 *   @param pi_customer_id specifies a row in our customer proxy domain mapping table
 *   @param pi_checksum_type specifies the checksum type (NULL, PUBLIC_BOOKMARK, PRIVATE_BOOKMARK, SESSION)
 *   @param pi_page_item_names specifies the page item names (1...n)
 *   @param pi_page_item_values specifies the corresponding page item values (1...n)
 *   @return varchar2 - the generated link
**/
function generate_page_link
(
  pi_app_id           in number
, pi_app_page_id      in number
, pi_app_user         in varchar2 default sys_context('apex$session','app_user')
, pi_customer_id      in number default null
, pi_checksum_type    in varchar2 default null
, pi_page_item_names  in APEX_T_VARCHAR2 default null
, pi_page_item_values in APEX_T_VARCHAR2 default null
) return varchar2
as
  l_instance_url varchar2(500);
  l_proxy_url varchar2(500);
  l_script_name varchar2(100);
  l_session_id number;
  l_page_items varchar2(1000);
  l_prepared_url varchar2(4000);
  l_link varchar2(4000);
begin
  -- basic validation for input parameters
  if pi_app_id is null
  or pi_app_page_id is null
  or (    pi_page_item_names is not null and pi_page_item_values is not null
      and pi_page_item_names.count != pi_page_item_values.count)
  then
    raise_application_error(-20001, 'Some input parameters are missing or given page item names and values do not contain the same number of elements.');
  end if;

  -- if this function is not called within an active APEX app session (e.g. Scheduler Job), we need to create it to be able to generate the link with checksum
  if  pi_checksum_type is not null
  and APEX_CUSTOM_AUTH.get_session_id is null
  then
    APEX_SESSION.create_session(
      p_app_id   => pi_app_id,
      p_page_id  => pi_app_page_id,
      p_username => pi_app_user
    );

    l_session_id := APEX_CUSTOM_AUTH.get_session_id;
  end if;

  -- try to get a proxy domain that is used by clients to access the app
  -- in my example, each customer has their own proxy domain to access their own APEX application
  -- example: https://customer1.example.com/ords/
  begin
    select proxy_url
    into l_proxy_url
    from customer_proxies
    where customer_id = pi_customer_id;
  exception
    when no_data_found then
      l_proxy_url := null;
  end;

  -- get the direct Oracle APEX instance url
  -- the Oracle APEX instance url needs to be set in the internal workspace (instance admin)
  -- it is used if no proxy url was found
  -- example: https://apex.example.com:8443/ords/
  l_instance_url := APEX_MAIL.get_instance_url;

  -- create a comma-separated string of page_item_name:page_item_value pairs for the link
  if pi_page_item_names is not null and pi_page_item_values is not null
  then
    for i in 1 .. pi_page_item_names.count
    loop
      l_page_items := l_page_items || pi_page_item_names(i) || ':' || UTL_URL.escape(pi_page_item_values(i));

      if i < pi_page_item_names.count
      then
        l_page_items := l_page_items || ',';
      end if;
    end loop;
  end if;

  -- function results of APEX_UTIL.prepare_url are dependent on the app's friendly url configuration
  -- we need to consider two points in case friendly urls are used in the current app session:
  --  * if we are not in an HTTP context (there are no CGI variables), APEX_UTIL.prepare_url will return an absolute url including the APEX instance url (domain name)
  --  * in case we are in an HTTP context, the url generated with APEX_UTIL.prepare_url will start with the SCRIPT_NAME path ("APEX_PATH"), so we need to make sure to not have it twice
  -- technically, it is possible to control whether friendly urls are generated by manually setting APEX_APPLICATION.g_friendly_url to true or false before calling APEX_UTIL.prepare_url
  -- note: the function uses the static instance url (APEX_MAIL.get_instance_url) if it generates an absolute url and does not evaluate dynamic CGI environment variables such as HTTP_HOST in case we access ORDS via a proxy
  --
  -- examples:
  --   g_friendly_url = true  - no HTTP context - https://apex.example.com:8443/ords/r/workspace_path_prefix/app_alias/page_alias?p10_item_value=xyz&clear=10&cs=ABCDEF123456
  --                          -    HTTP context - /ords/r/workspace_path_prefix/app_alias/page_alias?p10_item_value=xyz&clear=10&cs=ABCDEF123456
  --   g_friendly_url = false -                 - f?p=1234:10:::NO:10:P10_ITEM_VALUE:xyz&cs=ABCDEF123456
  l_prepared_url := APEX_UTIL.prepare_url(p_url => 'f?p=' || pi_app_id ||
                                                   ':' || pi_app_page_id ||
                                                   '::::' || pi_app_page_id ||
                                                   ':' || l_page_items
                                         ,p_checksum_type => pi_checksum_type
                                         ,p_plain_url => true);

  -- absolute url given
  if regexp_like(l_prepared_url, '^' || l_instance_url)
  then
    -- customer proxy url exists, so we can replace the instance url with the proxy url
    if l_proxy_url is not null
    then
      l_link := replace(l_prepared_url, l_instance_url, l_proxy_url);
    -- customer proxy url does not exist and the given url already includes the instance url, take it "as is"
    else
      l_link := l_prepared_url;
    end if;
  -- given url is relative
  -- the base url (proxy or instance url) needs to be added
  else
    -- get value of CGI variable SCRIPT_NAME (HTTP context)
    begin
      l_script_name := OWA_UTIL.get_cgi_env('SCRIPT_NAME');
    exception
      when others then
        l_script_name := null;
    end;

    -- SCRIPT_NAME path is included in given url
    if  l_script_name is not null
    and regexp_like(l_prepared_url, '^' || l_script_name)
    then
      if l_proxy_url is not null
      then
        -- if we have a proxy, remove trailing slash and SCRIPT_NAME path from given url to make sure we do not run into conflicts with proxy rewrite rules
        l_proxy_url := substr(l_proxy_url, 1, length(l_proxy_url) - 1);
        l_prepared_url := regexp_replace(l_prepared_url, '^' || l_script_name, '');
      else
        -- in case we are using the instance url, we need to remove the SCRIPT_NAME path
        l_instance_url := regexp_substr(l_instance_url, '^https?://([^/]+)', 1, 1, null, 0);
      end if;
    end if;

    -- priorize proxy url, take instance url as fallback
    l_link := coalesce(l_proxy_url, l_instance_url) || l_prepared_url;
  end if;

  -- clean up session if it was created before
  if  l_session_id is not null
  then
    APEX_SESSION.delete_session(p_session_id => l_session_id);
  end if;

  return l_link;
end generate_page_link;We can generate the following URLs for example:
- Proxy URL (Friendly URL):
https://customer1.example.com/ords/r/sales1/forecast/dashboard?p1_order_id=20&clear=1&cs=abcd1234 … - Instance URL (Friendly URL):
https://apex.example.com:8443/ords/r/sales1/forecast/dashboard?p1_order_id=20&clear=1&cs=abcd1234 … - Proxy URL (non-Friendly/legacy URL syntax):
https://customer2.example.com/ords/f?p=1234:1:::NO:1:P1_ORDER_ID:20&cs=abcd1234 … - Instance URL (non-Friendly/legacy URL syntax):
https://apex.example.com:8443/ords/f?p=1234:1:::NO:1:P1_ORDER_ID:20&cs=abcd1234 …
The key benefits of this approach are:
- avoid issues caused by missing session context and handle session creation automatically if none exist
- generation of absolute URLs for reliable use in emails and external systems – works with Friendly and non-Friendly URLs
- take and priorize customer-specific proxy domains, use the direct Oracle APEX instance URL as fallback
ORDS: Document your API using the OpenAPI Specs and Swagger
In this blog post I would like to show how you can integrate the Swagger UI into an APEX application to document your ORDS RESTful API endpoints. We will consume the OpenAPI specification auto-generated by ORDS, or a customized spec file if provided, and create a separate APEX Page Template for Swagger.
OpenAPI specification
A very useful, but not highly known feature of ORDS is the auto-generated OpenAPI specification for each endpoint you have defined in your ORDS RESTful Services. The JSON can be used to display the API definition in the Swagger UI. The URL syntax of the ORDS auto-generated OpenAPI definition of your endpoints is:
# Example
http://example.com/ords/myschema/open-api-catalog/v1/
└──────────┬──────┘└─┬┘└───┬────┘└──────┬───────┘└─┬┘
│ │ │ │ │
│ │ │ │ └ Module Base Path (URI Prefix)
│ │ │ │
│ │ │ └ Static Path for OpenAPI Catalog
│ │ │
│ │ └ Schema Alias (URL Mapping Pattern)
│ │
│ └ ORDS Alias (ORDS Path)
│
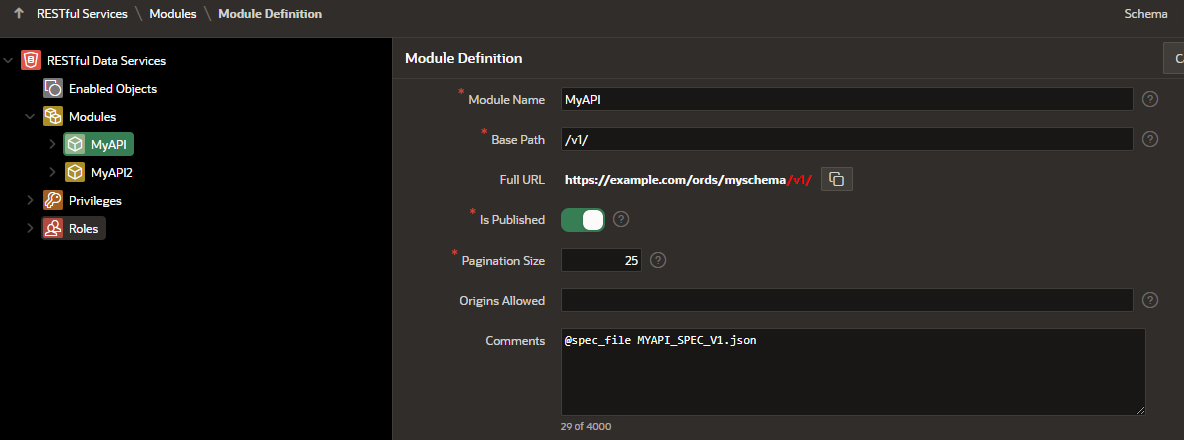
└ Server URLIn my demo APEX application, it will be possible to document the APIs using the default OpenAPI specification created by ORDS, or by using a self-created API definition JSON file. To design and document your APIs, you can use an editor tool like Stoplight Studio. In this case, you can upload your JSON file as a Static Application File to the APEX application. On the API module level of ORDS, you can define if your own JSON file should be taken for the Swagger UI by inserting @spec_file {myOwnAPISpec.json} into the Comment text field. If no file is specified, the default specification will be used.
You can use the following SQL query to display all your ORDS RESTful API modules that are linked to the current schema you are logged into, including the direct call URL and the URL to retrieve the OpenAPI specification JSON (auto-generated by ORDS or your own shipped spec file, if specified).
Note: The SQL statement will consume the function APEX_MAIL.get_instance_url() to return the Server Host URL of your APEX instance. To get the correct URL, the Instance URL needs to be set in the APEX INTERNAL Workspace under Manage Instance > Instance Settings > Email > Oracle APEX Instance URL. You can define a static value or use other functions instead, like APEX_UTIL.host_url, but those are dependent on an existing HTTP context in the session to return a value.
select
   ords_mod.id as service_module_id,
   ords_mod.name as service_module_name,
   app.application_id,
   app.application_name,
   APEX_MAIL.get_instance_url || ords_schema.pattern || ords_mod.uri_prefix as ords_module_direct_url,
   APEX_MAIL.get_instance_url ||
     case
       when spec.application_file_id is not null then
         lower(ws.path_prefix) || '/r/' || app.application_id || '/files/static/v' || app.files_version || '/' || spec.file_name
       else
         ords_schema.pattern || '/open-api-catalog' || ords_mod.uri_prefix
     end
   as openapi_spec_direct_url
from apex_applications app
join apex_workspaces ws on app.workspace = ws.workspace
join user_ords_schemas ords_schema on app.owner = ords_schema.parsing_schema
join user_ords_modules ords_mod on ords_schema.id = ords_mod.schema_id
left join apex_application_static_files spec on app.application_id = spec.application_id and regexp_substr(ords_mod.comments, '^@spec_file[[:space:]]+(.*?)$', 1, 1, 'i', 1) = spec.file_name
where ords_mod.name != 'oracle.example.hr' and ords_mod.status = 'PUBLISHED'
Create a new APEX Page Template
To integrate the Swagger UI into your APEX application, we first need to download the JavaScript and CSS dependencies from GitHub. You can upload them to your Workspace as Static Application Files in the Shared Components of your APEX app.
- swagger-ui-standalone-preset.js
https://github.com/swagger-api/swagger-ui/blob/master/dist/swagger-ui-standalone-preset.js - swagger-ui-bundle.js
https://github.com/swagger-api/swagger-ui/blob/master/dist/swagger-ui-bundle.js - swagger-ui.css
https://github.com/swagger-api/swagger-ui/blob/master/dist/swagger-ui.css
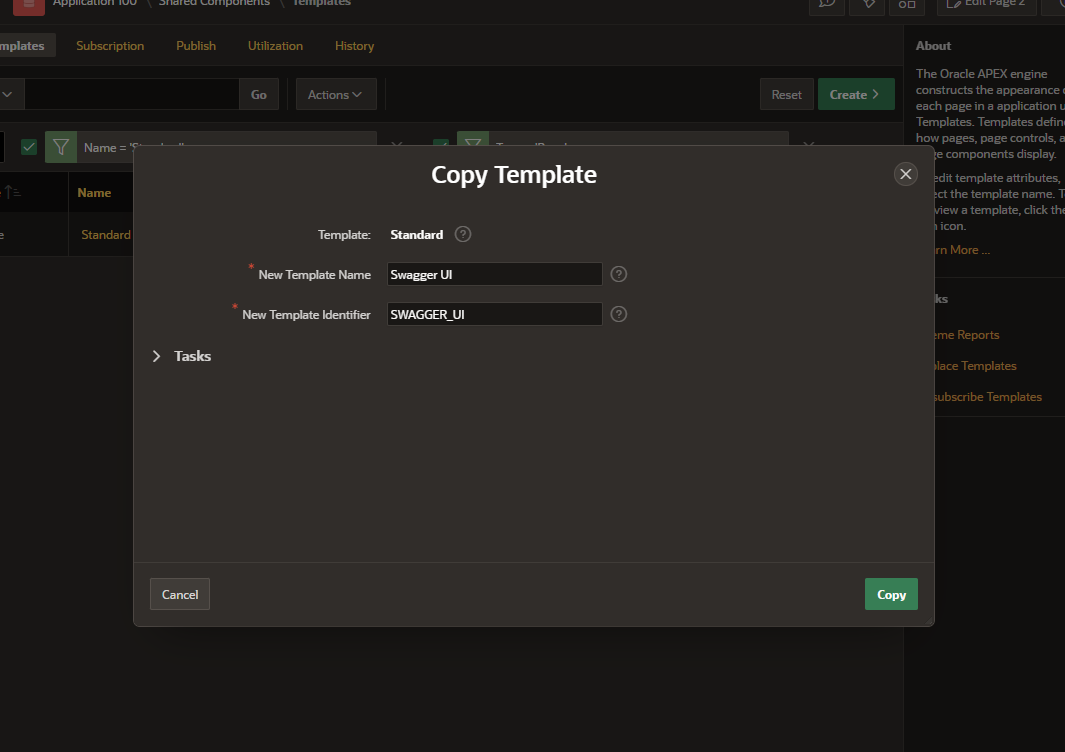
Next, we need to create a new Page Template in the APEX application. It will be based on the Standard Page Template of APEX. Inside the Shared Components, navigate through User Interface > Templates. In the following report, search for “Page” as Type and “Standard” as Name. Click on the icon inside the “Copy” column and define “Swagger UI” as the New Template Name. Afterwards, you can click on the button Copy.
We need to adapt the template a bit. Most of the HTML sub-templates will stay the same. The major difference is that the substitution strings for the form element (#FORM_OPEN# and #FORM_CLOSE#) will be removed from the Header and Footer template and moved both inside the Body template. This is necessary to avoid conflicts with the Swagger JavaScript.
Paste the following HTML content inside the Header template definition:
<!DOCTYPE html>
<html class="no-js #RTL_CLASS# page-&APP_PAGE_ID. app-&APP_ALIAS." lang="&BROWSER_LANGUAGE." #TEXT_DIRECTION#>
<head>
  <meta http-equiv="x-ua-compatible" content="IE=edge" />
  <meta charset="utf-8">
  <title>#TITLE#</title>
  #APEX_CSS#
  #THEME_CSS#
  #TEMPLATE_CSS#
  #THEME_STYLE_CSS#
  #APPLICATION_CSS#
  #PAGE_CSS#
  #FAVICONS#
  #HEAD#
  <meta name="viewport" content="width=device-width, initial-scale=1.0" />
</head>
<body class="t-PageBody t-PageBody--hideLeft t-PageBody--hideActions no-anim t-PageTemplate--standard #PAGE_CSS_CLASSES#" #TEXT_DIRECTION# #ONLOAD# id="t_PageBody">
<a href="#main" id="t_Body_skipToContent">&APP_TEXT$UI_PAGE_SKIP_TO_CONTENT.</a>
<header class="t-Header" id="t_Header" role="banner">
  #REGION_POSITION_07#
  <div class="t-Header-branding">
    <div class="t-Header-controls">
      <button class="t-Button t-Button--icon t-Button--header t-Button--headerTree" aria-label="&"APP_TEXT$APEX.TEMPLATE.MAIN_NAV_LABEL"." title="&"APP_TEXT$APEX.TEMPLATE.MAIN_NAV_LABEL"." id="t_Button_navControl" type="button"><span class="t-Header-controlsIcon" aria-hidden="true"></span></button>
    </div>
    <div class="t-Header-logo">
      <a href="#HOME_LINK#" class="t-Header-logo-link">#LOGO#</a>
      #AFTER_LOGO#
    </div>
    <div class="t-Header-navBar">
      <div class="t-Header-navBar--start">#BEFORE_NAVIGATION_BAR#</div>
      <div class="t-Header-navBar--center">#NAVIGATION_BAR#</div>
      <div class="t-Header-navBar--end">#AFTER_NAVIGATION_BAR#</div>
    </div>
  </div>
  <div class="t-Header-nav">#TOP_GLOBAL_NAVIGATION_LIST##REGION_POSITION_06#</div>
</header>
The Body template will includes a <div> container with identifier “swagger-ui” that will be used to hold our Swagger UI contents later on:
<div class="t-Body">
  #SIDE_GLOBAL_NAVIGATION_LIST#
  <div class="t-Body-main">
    <div class="t-Body-title" id="t_Body_title">#REGION_POSITION_01#</div>
    <div class="t-Body-content" id="t_Body_content">
      <main id="main" class="t-Body-mainContent">
        #SUCCESS_MESSAGE##NOTIFICATION_MESSAGE##GLOBAL_NOTIFICATION#
        #FORM_OPEN#
        <div class="t-Body-fullContent">#REGION_POSITION_08#</div>
        <div class="t-Body-contentInner">#BODY#</div>
        #FORM_CLOSE#
        <div id="swagger-ui"></div>
      </main>
      <footer class="t-Footer" id="t_Footer" role="contentinfo">
        <div class="t-Footer-body">
          <div class="t-Footer-content">#REGION_POSITION_05#</div>
          <div class="t-Footer-apex">
            <div class="t-Footer-version">#APP_VERSION#</div>
            <div class="t-Footer-customize">#CUSTOMIZE#</div>
            #BUILT_WITH_LOVE_USING_APEX#
          </div>
        </div>
        <div class="t-Footer-top">
          <a href="#top" class="t-Footer-topButton" id="t_Footer_topButton" title="&"APP_TEXT$APEX.UI.BACK_TO_TOP"." aria-label="&"APP_TEXT$APEX.UI.BACK_TO_TOP"."><span class="a-Icon icon-up-chevron" aria-hidden="true"></span></a>
        </div>
      </footer>
    </div>
  </div>
</div>
<div class="t-Body-inlineDialogs" id="t_Body_inlineDialogs">#REGION_POSITION_04#</div>
The Footer template will include:
#DEVELOPER_TOOLBAR#
#APEX_JAVASCRIPT#
#GENERATED_CSS#
#THEME_JAVASCRIPT#
#TEMPLATE_JAVASCRIPT#
#APPLICATION_JAVASCRIPT#
#PAGE_JAVASCRIPT#
#GENERATED_JAVASCRIPT#
</body>
</html>
As JavaScript > File URLs, reference the files we have uploaded as Static Application Files before:
#APP_FILES#swagger-ui-standalone-preset.js
#APP_FILES#swagger-ui-bundle.js
Inside the textarea for Function and Global Variable Declaration, enter the following:
var openApiSpecUrl = $v('P' + $v('pFlowStepId') + '_OPENAPI_SPEC_URL');
var moduleDirectUrl = $v('P' + $v('pFlowStepId') + '_DIRECT_URL');
As Execute when Page Loads, enter the following JavaScript code:
apex.theme42.initializePage.noSideCol();

$.getJSON(decodeURIComponent(openApiSpecUrl), function (data) {

  // Add the direct full URL and remove any other server, if existing
  if (!data.hasOwnProperty("servers")) {
    data.servers = [{"url": moduleDirectUrl}];
  } else if(data.servers.length === 0) {
    data.servers.push({"url": moduleDirectUrl});
  } else {
    for (var el in data.servers){
      if (el == 0){
        data.servers[el]['url'] = moduleDirectUrl;
      } else {
        delete data.servers[el];
      }
    }
  }

  // Build Swagger UI with options
  SwaggerUIBundle({
    spec: data,
    dom_id: '#swagger-ui',
    presets: [
      SwaggerUIBundle.presets.apis,
      SwaggerUIStandalonePreset
    ],
    layout: "BaseLayout",
    validatorUrl: null,
    defaultModelsExpandDepth: 0
  });

});
Reference the CSS file of Swagger in Cascading Style Sheet > File URLs:
#APP_FILES#swagger-ui.cssLast but not least, add a short custom CSS definition as Inline that applies to the <form> element on the page. It will overwrite the default definition that is not needed for our new Page Template. Additionally, the servers list drop-down can be hidden, because the URL will be automatically determined.
form#wwvFlowForm {
    min-height: unset !important;
}
.schemes-server-container {
    display: none !important;
}
All other settings do not need to be adjusted.
Create an APEX Page based on the new Page Template
Create a new APEX page and select “Blank Page” as its Type. In my example, I have used 2 as Page ID and “API” as its Page name. Next, in the Page Designer, select “Swagger UI” as the Page Template.
Create a new Static Content region “Select Module” with “Blank with Attributes” as its Template (region setting “Appearance”).
Create a page item P2_MODULE_ID of Type “Select List”. As Label you can define “Select API”. For Settings > Page Action on Selection, choose “Submit Page“. As the Source of the List of Values, select option “SQL Query” as “Type” with the following query:
select
  APEX_UTIL.host_url('APEX_PATH') || s.pattern || m.uri_prefix as d,
  m.id as r
from user_ords_modules m
join user_ords_schemas s on m.schema_id = s.id
where m.status = 'PUBLISHED'
order by m.name;
Next on, create a second page item P2_DIRECT_URL. It will be used to define the Full URL including the Base Path. Change its Type to “hidden“, the Source Type to “SQL Query (return single value)” with the following SQL statement as its Source:
select
  APEX_UTIL.host_url('APEX_PATH') || s.pattern || m.uri_prefix
from user_ords_modules m
join user_ords_schemas s on m.schema_id = s.id
where m.id = :P2_MODULE_ID;
The third page item P2_OPENAPI_SPEC_URL will hold the URL to the OpenAPI JSON specification. Set the Type to “hidden” and enter the following SQL Query as Source for “SQL Query (return single value)“:
with openapi_spec as
(
  select
    m.id,
    APEX_UTIL.host_url('APEX_PATH') || s.pattern || '/open-api-catalog' || m.uri_prefix as default_openapi_spec,
    regexp_substr(m.comments, '^@spec_file[[:space:]]+(.*?)$', 1, 1, 'i', 1) as custom_openapi_spec
  from user_ords_modules m
  join user_ords_schemas s on m.schema_id = s.id
  where m.id = :P2_MODULE_ID
)
select
  case when custom_openapi_spec is null
  then
     default_openapi_spec
  else
     '#APP_FILES#' || custom_openapi_spec
  end as spec_url
from openapi_spec;
For both hidden items (P2_DIRECT_URL and P2_OPENAPI_SPEC_URL), select for attribute “Used” the option “Always, replacing any existing value in session state“.
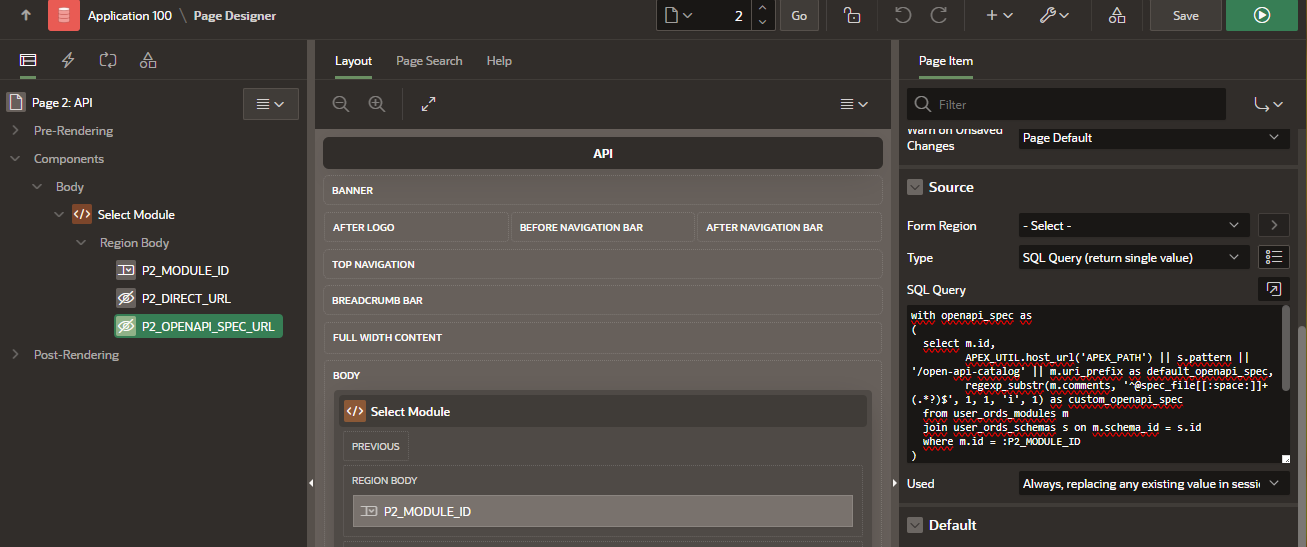
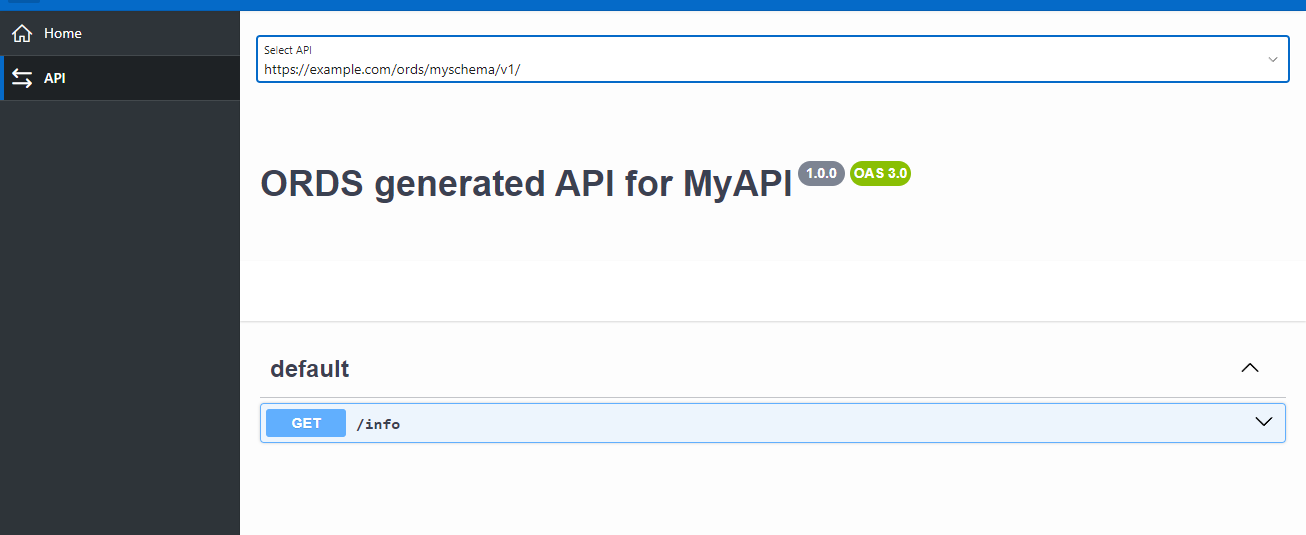
That’s all! When running the new APEX page, the user can choose between all ORDS modules (APIs) that are linked to the owner of the APEX application and run specific endpoints.
How to secure connections to your Oracle database over TLS or by SSH tunnels
If you want to establish a connection to your Oracle database over the public Internet, it is recommended to do so by encrypted connections. The Oracle database tools allow users to connect via Transport Layer Security (TLS) or by using SSH tunnels. In this blog post I would like to show how you can connect over SSH tunnels, how to set up your database for allowing secure connections to your database over TLS, as well as how to use client certificates for user authentication. Additionally I will explain any kind of configuration needed when using tools like SQLcl, SQL Developer or the Visual Studio Code Extension of SQL Developer.
| Method | Advantages | Disadvantages |
|---|---|---|
| Connections over TLS |
|
|
| SSH tunnels |
|
|
Connections over TLS
If you want to allow TLS encrypted connections to your database, you can create and use an Oracle Wallet to save your certificates. To create the Oracle Wallet, you can use the orapki utility which is part of each database installation. You can find the utility in the bin directory of the Oracle Home – $ORACLE_HOME/bin/orapki.
It is possible to create a server wallet and client wallet, whereby the client wallet is optional. This is the case if
- a client certificate is not needed for user authentication on the database (eg. SSL_CLIENT_AUTHENTICATION is disabled), and
- the server certificate was issues by a trusted Certificate Authority (CA) that is stored in the client system’s certificate store.
If the server certificate is not stored on the client’s certificate store, or if you want to authenticate the user by the client certificate (mTLS), you will need to create a client wallet. In this blog post, I will show the configurations needed for this kind of user authentication.
Create Client Wallet: First, we will create the Oracle Wallet and certificate on client side and let the Oracle Wallet on the database server sign the client certificate later on. Alternatively, you may set one or multiple Subject Alternative Names (SAN) comma separated to your client certificate signing request. Please adapt the option argument values as needed.
# create wallet
orapki wallet create -wallet {path/to/store/client/wallet} -pwd {password} -auto_login_local

# create and export client certificate signing request
orapki wallet add -wallet {path/to/your/client/wallet} -pwd {password} -dn "CN={yourClientCommonName}" -keysize 2048 -validity 1825 -addext_san DNS:{yourSubjectAlternativeName}
orapki wallet export -wallet {path/to/your/client/wallet} -pwd {password} -dn "CN={yourClientCommonName}" -request {path/to/save/your}/client_signing_request.csr
Create Server Wallet: Create the Oracle Wallet on server side (database). Afterwards, you can import the Client certificate signing request client_signing_request.csr to let your Server CA issue a new certificate for the client.
# create wallet
orapki wallet create -wallet {path/to/save/server/wallet} -pwd {password} -auto_login_local

# create self-signed cert
orapki wallet add -wallet {path/to/your/server/wallet} -pwd {password} -dn "CN={yourCACommonName}" -keysize 2048 -self_signed -validity 3650

# display all wallet certificates (it should show your server CA certificate)
orapki wallet display -wallet {path/to/your/server/wallet} -complete

# create cert by client certificate signing request
orapki cert create -wallet {path/to/your/server/wallet} -request {path/to/your}/client_signing_request.csr -cert {path/to/save}/client_certificate.crt -validity 1825 -pwd {password}

# export server certificate
orapki wallet export -wallet {path/to/your/server/wallet} -pwd {password} -dn "CN={yourServerCommonName}" -cert {path/to/save/your}/server_certificate.crt
Import certificates into Wallet: Import certificate client_certificate.crt as user certificate and server_certificate.crt as trusted certificate to your Client Oracle Wallet.
# add trusted CA server certificate
orapki wallet add -wallet {path/to/your/client/wallet} -pwd {password} -trusted_cert -cert {path/to/your}/server_certificate.crt

# import CA signed client certificate
orapki wallet add -wallet {path/to/your/client/wallet} -pwd {password} -user_cert -cert {path/to/your}/client_certificate.crt

# display all wallet certificates (it should show your imported certificates)
orapki wallet display -wallet {path/to/your/client/wallet} -complete
Configure SQLnet.ora: Next we need to configure the SQLnet.ora files on the client and server side. Here we can define the location of our Oracle Wallet and define Parameter settings for TLS. On the client configuration, we define the following settings to ensure only strong ciphers are used.
WALLET_LOCATION =
   (SOURCE =
     (METHOD = FILE)
     (METHOD_DATA =
       (DIRECTORY = {path/to/your/client/wallet})
     )
   )

SQLNET.AUTHENTICATION_SERVICES = (TCPS)
SSL_CLIENT_AUTHENTICATION = FALSE
SSL_SERVER_DN_MATCH = ON
SSL_VERSION = 1.2
SSL_CIPHER_SUITES = (TLS_ECDHE_RSA_WITH_AES_256_GCM_SHA384, TLS_ECDHE_RSA_WITH_AES_128_GCM_SHA256, TLS_ECDHE_ECDSA_WITH_AES_256_GCM_SHA384, TLS_ECDHE_ECDSA_WITH_AES_128_GCM_SHA256, TLS_DHE_RSA_WITH_AES_256_GCM_SHA384, TLS_DHE_RSA_WITH_AES_128_GCM_SHA256)
On the database server, similiar configurations can be set. In this case SSL_CLIENT_AUTHENTICATION will be set to TRUE to activate user authentication.
WALLET_LOCATION =
   (SOURCE =
     (METHOD = FILE)
     (METHOD_DATA =
       (DIRECTORY = {path/to/your/server/wallet})
     )
   )

SQLNET.AUTHENTICATION_SERVICES = (TCPS)
SSL_CLIENT_AUTHENTICATION = TRUE
SSL_VERSION = 1.2
SSL_CIPHER_SUITES = (TLS_ECDHE_RSA_WITH_AES_256_GCM_SHA384, TLS_ECDHE_RSA_WITH_AES_128_GCM_SHA256, TLS_ECDHE_ECDSA_WITH_AES_256_GCM_SHA384, TLS_ECDHE_ECDSA_WITH_AES_128_GCM_SHA256, TLS_DHE_RSA_WITH_AES_256_GCM_SHA384, TLS_DHE_RSA_WITH_AES_128_GCM_SHA256)
Configure listener.ora: On the database server we need to add the Oracle Wallet and the Protocol Information to make the database listen on default Port 2484 for TCPS. You may use any other Port if you like.
WALLET_LOCATION =
  (SOURCE =
    (METHOD = FILE)
    (METHOD_DATA =
      (DIRECTORY = {path/to/your/server/wallet})
    )
  )

LISTENER =
  (DESCRIPTION_LIST =
    (DESCRIPTION =
      (ADDRESS = (PROTOCOL = TCP)(HOST = localhost)(PORT = 1521))
      (ADDRESS = (PROTOCOL = TCPS)(HOST = {yourHostname})(PORT = 2484))
    )
  )
Configure TNSnames.ora: Finally, you can add the TCPS connection to your tnsnames.ora file on the client system. The parameter WALLET_LOCATION (MY_WALLET_DIRECTORY is deprecated since Oracle 23ai) allows you to specify the Oracle Wallet location where your certificates are stored. In the example below, I am using MYPDB as the Network Alias.
MYPDB=
  (DESCRIPTION=
    (ADDRESS=
      (PROTOCOL=TCPS)
      (HOST={yourHostname})
      (PORT=2484)
    )
    (CONNECT_DATA=
      (SERVICE_NAME={ServiceName})
    )
    (SECURITY=
      (SSL_SERVER_CERT_DN="CN={yourServerCommonName}")
      (SSL_SERVER_DN_MATCH=TRUE)
      (WALLET_LOCATION={path/to/your/client/wallet})
    )
  )
That’s it! If you are using SQL Developer, you can set the TNSnames directory via Tools > Preferences > Database > Advanced > TNSnames Directory. Afterwards, you can select {MYPDB} as the Network Alias in the connection settings. For SQLcl, you can set the environment variable TNS_ADMIN to link to the directory where your tnsnames.ora file is saved.
Optional – Activate TLS as an Authentication Service: In Oracle database it is possible to use TLS as an Authentication Service for user authentication. While remote OS authentication is deprecated since Oracle 21c and has been removed in 23ai, the authentication based on TLS certificates is still available. You can use it for a database schema by using the IDENTIFIED EXTERNALLY clause specifying the Distinguished Name (DN) of the certificate when creating or altering an user, for example:
-- Create or alter user
CREATE USER MYUSER IDENTIFIED EXTERNALLY AS 'CN={yourClientCommonName}';
ALTER USER MYUSER IDENTIFIED EXTERNALLY AS 'CN={yourClientCommonName}';

-- Minimal grants
GRANT CONNECT, CREATE SESSION TO MYUSER;
To be able to connect to a schema in SQL Developer, you need to activate TCPS as an authentication service in the config file of SQL Developer. Add the following line (or include value TCPS as available authentication service, separated by a comma) to your config in …/sqldeveloper/bin/sqldeveloper.conf:
....
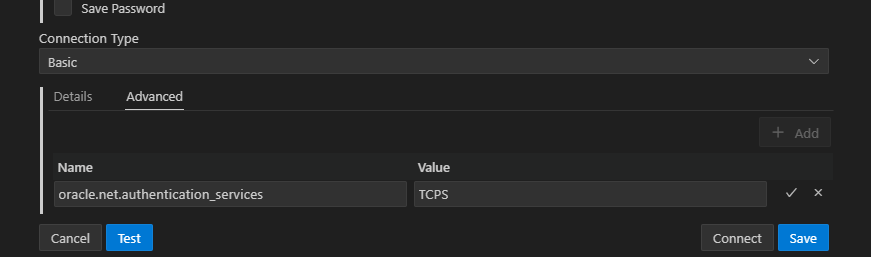
AddVMOption -Doracle.net.authentication_services=(TCPS)For the Visual Studio Code Extension of SQL Developer, you can add this option in the “Advanced” tab inside the connection settings. There you can set a new property “oracle.net.authentication_services” as Name and “TCPS” as its Value.
When using SQLcl, you need to set this configuration by the environment variable JAVA_TOOL_OPTIONS.
SET JAVA_TOOL_OPTIONS=-Doracle.net.authentication_services=(TCPS)
SET TNS_ADMIN={path/to/your/tnsnames.ora}
sql {user}@{MYPDB}
SQL> Connected.
....
If SQL Developer or SQLcl asks you for a schema password, you can leave it empty.
SSH tunnels
If you want to be able to use SSH tunnels to securely connect to the database, you need to have access to the host system the database is running on. As Public Key Authentication is needed, you need to create an SSH Public Key and save it in the authorized_keys file on the host system.
SQL Developer: When using SQL Developer, you first need to add the SSH panel to the GUI (menu View > SSH). You can add a new SSH host and specify hostname and username for the SSH session, as well as hostname and port for the database connection.
To use the SSH tunnel for a connection to the database, you need to set SSH as the Connection Type and select your previously created SSH tunnel name as Port Forward.
SQLcl: You need to start SQLcl without logging in. Afterwards you can execute the sshtunnel command and log in via EZ Connect Naming Method. In my example, the remote database is running on localhost Port 1521.
SET TNS_ADMIN={path/to/your/tnsnames.ora}
sql /nolog
SQL> sshtunnel oracle@example.tld:22 -i ~/.ssh/id_rsa -L 1521:localhost:1521
Using port: 22
SSH Tunnel connected
SQL> conn {user}@{MYPDB}
SQL> Connected.
....
You need to specify the host connection details in your SSH tunnel settings. Therefore, you cannot use the tnsnames.ora file to save any SSH tunnel details.
Part 2: Import binary raw data files during APEX App Import
In the previous blog post, we have seen how to export the binary raw data of application and workspace files during an APEX application export. This post will focus on how to import files to APEX during the Application import process.
Like described in Part 1: Export APEX App with workspace and application files in uncoded binary raw data format, let’s imagine we have some files saved in directories named workspace_files and application_files inside /tmp/apex/application/shared_components/ and we want to upload them to the APEX instance during our deployment. To achieve that, we need to convert all raw file contents to a readable hexadecimal format and save these code lines in an SQL script that can be executed in the database.

For doing that, we will use the Bash script below that will convert all raw contents of files to their hexadecimal representation. It will create a customized install file for installing the APEX app and importing the files on the workspace afterwards.
Please note that (as of APEX 24.1) there is no documented PL/SQL API provided by Oracle to import files into an APEX application or workspace. Therefore, we will rely on the upload procedures for workspace and application files given in the internal APEX packages WWV_FLOW_API and WWV_FLOW_IMP_SHARED.
For identifying the MIME type for each file extension, we will use the Oracle XML DB resource API, accessable over package DBMS_XDB. You may also use any other function or the file command in Linux to identify MIME types. The function we consume is named get_mime_type() as shown below. To convert the file contents from hexadecimal back to raw format during the import, we use the Oracle provided function of hextoraw(). This conversion is made by the function varchar2_tab_to_blob() in our script.
You can display available options by providing the “-help” option when calling the script.
sh create_custom_install_and_file_upload_scripts.sh -help
#!/bin/bash

# create_custom_install_and_file_upload_scripts.sh
#
# This script saves encoded data
# of workspace and application
# files in an upload SQL file
# and creates a customized install
# script for the APEX application

## Global Constants and Settings
readonly IMPORT_APEX_BASE_DIR_LOC="/tmp"
readonly IMPORT_APEX_DIR="apex"
readonly IMPORT_APEX_SHARED_COMPONENTS_PATH="${IMPORT_APEX_BASE_DIR_LOC}/${IMPORT_APEX_DIR}/application/shared_components"
readonly IMPORT_APEX_WORKSPACE_FILES_DIR="workspace_files"
readonly IMPORT_APEX_APP_FILES_DIR="application_files"
readonly IMPORT_APEX_APP_UPLOAD_FILES_NAME="upload_files.sql"
readonly IMPORT_APEX_APP_INSTALL_FILE_NAME="install_apex_app_with_files.sql"

readonly FONT_YELLOW='\033[1;33m'
readonly FONT_NOCOLOR='\033[0m'

## Functions

# Help text displayed to user in case of invalid script calls or via -help option
printHelpText()
{
   echo ""
   echo "Usage: $0 -apexAppId=<APEX_APP_ID> [-apexAppAlias=<APEX_APP_ALIAS>] [-workspaceName=<WORKSPACE_NAME>] [-schemaName=<SCHEMA_NAME>]"
   echo ""
   echo "Available Options:"
   echo -e "\t${FONT_YELLOW}-apexAppId${FONT_NOCOLOR}      - APEX App Id"
   echo -e "\t${FONT_YELLOW}-apexAppAlias${FONT_NOCOLOR}   - APEX App Alias (optional)"
   echo -e "\t${FONT_YELLOW}-workspaceName${FONT_NOCOLOR}  - Workspace Name (optional)"
   echo -e "\t${FONT_YELLOW}-schemaName${FONT_NOCOLOR}     - Schema Name (optional)"
   echo -e "\t${FONT_YELLOW}-help${FONT_NOCOLOR}           - Prints this help text"
   echo ""
}

# Assigns given option args to vars
assignOptsToVars()
{
  while [ "$1" != "" ];
  do
    opt=`echo $1 | awk -F= '{print $1}'`
    optarg=`echo $1 | awk -F= '{print $2}'`
    case "$opt" in
      -help ) printHelpText
              exit ;;
      -apexAppId ) APEX_APP_ID="$optarg" ;;
      -apexAppAlias ) APEX_APP_ALIAS="$optarg" ;;
      -workspaceName ) WORKSPACE_NAME="$optarg" ;;
      -schemaName ) SCHEMA_NAME="$optarg" ;;
      * ) echo "ERROR: Unknown option provided: \"$opt\"."
          echo ""
          printHelpText
          exit 1 ;;
    esac
    shift
  done
}

# Verifies given option args
verifyOptions()
{
  if [ "$APEX_APP_ID" == "" ]; then
    echo "ERROR: Please provide all necessary option arguments. Use -help to show a list of all options."
    echo ""
    exit 1
  fi
}

# Prints Stage to output
printStage()
{
   echo ""
   echo "#"
   echo "# $1"
   echo "#"
   echo ""
}

# Prints Stage Result to output
printStageResult()
{
   echo ""
   echo ".. $1"
   echo ""
}

# Cleans up custom files in case of Errors
cleanup()
{
   local UPLOAD_FILE_LOC="${IMPORT_APEX_BASE_DIR_LOC}/${IMPORT_APEX_DIR}/${IMPORT_APEX_APP_UPLOAD_FILES_NAME}"
   local INSTALL_FILE_LOC="${IMPORT_APEX_BASE_DIR_LOC}/${IMPORT_APEX_DIR}/${IMPORT_APEX_APP_INSTALL_FILE_NAME}"

   if [ -f "${UPLOAD_FILE_LOC}" ]; then rm "${UPLOAD_FILE_LOC}"; fi
   if [ -f "${INSTALL_FILE_LOC}" ]; then rm "${INSTALL_FILE_LOC}"; fi
}

# exits script with error or success
exitScript()
{
   local EXIT_WITH_ERROR="$1"

   if [ "$EXIT_WITH_ERROR" == "Y" ]
   then
     echo "Some scripts failed."
     exit 1
   else
     echo "Finished."
     exit 0
   fi
}

# generates files upload script content
generateFilesUploadScriptContent()
{
  local DIR
  local DIR_PATH_FILE_NAME
  local FILE_NAME
  local INDEX

  echo "SET SERVEROUTPUT ON"
  echo "DECLARE
  TYPE VARCHAR2_TAB_T  IS TABLE OF VARCHAR2(32767) INDEX BY BINARY_INTEGER;

  l_apex_app_id        NUMBER := ${APEX_APP_ID};
  l_workspace_id       NUMBER;
  l_dir_path_file_name VARCHAR2(500);
  l_file_name          VARCHAR2(200);
  l_mime_type          VARCHAR2(128);
  l_file_content       VARCHAR2_TAB_T;

  FUNCTION get_mime_type(
    pi_file_name IN VARCHAR2
  ) RETURN VARCHAR2
  IS
    l_mime_type VARCHAR2(128);
  BEGIN
    SELECT mime_type
    INTO l_mime_type
    FROM XMLTABLE(
      XMLNAMESPACES(
      DEFAULT 'http://xmlns.oracle.com/xdb/xdbconfig.xsd'),
        '//mime-mappings/mime-mapping'
        PASSING xdb.dbms_xdb.cfg_get()
      COLUMNS
        extension VARCHAR2(50) PATH 'extension',
        mime_type VARCHAR2(128) PATH 'mime-type'
    )
    WHERE LOWER(extension) = LOWER(SUBSTR(pi_file_name, INSTR(pi_file_name, '.', -1) + 1));

    RETURN l_mime_type;
  EXCEPTION
    WHEN OTHERS THEN
      RETURN NULL;
  END get_mime_type;

  FUNCTION varchar2_tab_to_blob(
    pi_vc2_table IN VARCHAR2_TAB_T
  ) RETURN BLOB
  IS
    l_blob BLOB;
    l_size NUMBER;
  BEGIN
    DBMS_LOB.createtemporary(l_blob, true, DBMS_LOB.session);

    FOR i IN 1 .. pi_vc2_table.COUNT
    LOOP
      l_size := LENGTH(pi_vc2_table(i)) / 2;
      DBMS_LOB.writeappend(l_blob, l_size, hextoraw(pi_vc2_table(i)));
    END LOOP;

    RETURN l_blob;
  EXCEPTION
    WHEN OTHERS THEN
      IF DBMS_LOB.istemporary(lob_loc => l_blob) = 1
      THEN
        DBMS_LOB.freetemporary(lob_loc => l_blob);
      END IF;
      RAISE;
  END varchar2_tab_to_blob;
  "

 echo "BEGIN
  SELECT workspace_id
  INTO l_workspace_id
  FROM apex_applications
  WHERE application_id = l_apex_app_id;

  APEX_UTIL.set_security_group_id(p_security_group_id => l_workspace_id);"

  DIR="${IMPORT_APEX_SHARED_COMPONENTS_PATH}/${IMPORT_APEX_WORKSPACE_FILES_DIR}"
  for FILE in $(find $DIR/* -type f -name '*' 2>/dev/null);
  do
    DIR_PATH_FILE_NAME=${FILE#*$DIR"/"}
    FILE_NAME=$(basename -- "$FILE")

    echo "
    BEGIN
      l_dir_path_file_name := '${DIR_PATH_FILE_NAME}';
      l_file_name := '${FILE_NAME}';
      l_mime_type := get_mime_type(pi_file_name => l_file_name);
    "

    echo "      l_file_content := NEW VARCHAR2_TAB_T();"

    INDEX=1
    for LINE in $(od -t x1 -An -v "$FILE" | tr -d '\n ' | fold -w 200)
    do
      echo "      l_file_content("$INDEX") := '"$LINE"';"
      INDEX=$(($INDEX+1))
    done

    echo "
      WWV_FLOW_API.create_workspace_static_file(p_file_name    => l_dir_path_file_name,
                                                p_mime_type    => nvl(l_mime_type, 'application/octet-stream'),
                                                p_file_charset => 'utf-8',
                                                p_file_content => varchar2_tab_to_blob(pi_vc2_table => l_file_content)
                                               );
      DBMS_OUTPUT.put_line('INFO: Workspace File ' || l_dir_path_file_name || ' uploaded successfully.');
    EXCEPTION
      WHEN OTHERS THEN
        RAISE_APPLICATION_ERROR(-20000, 'ERROR: Workspace File ' || l_dir_path_file_name || ' could not be uploaded - ' || SQLERRM || ' - ' || DBMS_UTILITY.format_error_backtrace);
    END;"
  done

  DIR="${IMPORT_APEX_SHARED_COMPONENTS_PATH}/${IMPORT_APEX_APP_FILES_DIR}"
  for FILE in $(find $DIR/* -type f -name '*' 2>/dev/null);
  do
    DIR_PATH_FILE_NAME=${FILE#*$DIR"/"}
    FILE_NAME=$(basename -- "$FILE")

    echo "
    BEGIN
      l_dir_path_file_name := '${DIR_PATH_FILE_NAME}';
      l_file_name := '${FILE_NAME}';
      l_mime_type := get_mime_type(pi_file_name => l_file_name);
    "

    echo "      l_file_content := NEW VARCHAR2_TAB_T();"

    INDEX=1
    for LINE in $(od -t x1 -An -v "$FILE" | tr -d '\n ' | fold -w 200)
    do
      echo "      l_file_content("$INDEX") := '"$LINE"';"
      INDEX=$(($INDEX+1))
    done

    echo "
      WWV_FLOW_IMP_SHARED.create_app_static_file(p_flow_id      => l_apex_app_id,
                                                 p_file_name    => l_dir_path_file_name,
                                                 p_mime_type    => nvl(l_mime_type, 'application/octet-stream'),
                                                 p_file_charset => 'utf-8',
                                                 p_file_content => varchar2_tab_to_blob(pi_vc2_table => l_file_content)
                                                );
      DBMS_OUTPUT.put_line('INFO: Application File ' || l_dir_path_file_name || ' uploaded successfully.');
    EXCEPTION
      WHEN OTHERS THEN
        RAISE_APPLICATION_ERROR(-20000, 'ERROR: Application File ' || l_dir_path_file_name || ' could not be uploaded - ' || SQLERRM || ' - ' || DBMS_UTILITY.format_error_backtrace);
    END;"
  done

  echo "COMMIT;"
  echo "END;"
  echo "/"
  echo ""
}

# generates custom install script content
generateInstallScriptContent()
{
  echo "BEGIN"
  echo "  APEX_APPLICATION_INSTALL.generate_offset();"
  echo "  APEX_APPLICATION_INSTALL.set_application_id(${APEX_APP_ID});"
  if [ "$APEX_APP_ALIAS" != "" ]; then
    echo "  APEX_APPLICATION_INSTALL.set_application_alias('${APEX_APP_ALIAS}');"
  fi
  if [ "$WORKSPACE_NAME" != "" ]; then
    echo "  APEX_APPLICATION_INSTALL.set_workspace('${WORKSPACE_NAME}');"
  fi
  if [ "$SCHEMA_NAME" != "" ]; then
    echo "  APEX_APPLICATION_INSTALL.set_schema('${SCHEMA_NAME}');"
  fi
  echo "END;"
  echo "/"
  echo ""

  echo "PROMPT # Install APEX application"
  echo "@install.sql"
  echo ""
  echo "PROMPT # Upload static workspace and application files"
  echo "@${IMPORT_APEX_APP_UPLOAD_FILES_NAME}"
}

# creates files upload script
createFilesUploadScript()
{
  local UPLOAD_FILE_LOC="${IMPORT_APEX_DIR}/${IMPORT_APEX_APP_UPLOAD_FILES_NAME}"

  printStage "Create files upload script"

  generateFilesUploadScriptContent > "${UPLOAD_FILE_LOC}"

  if [ -f "${UPLOAD_FILE_LOC}" ]
  then
    printStageResult "Done: ${UPLOAD_FILE_LOC}"
  else
    printStageResult "ERROR: Failed to create files upload script."
    exitScript "Y"
  fi
}

# creates custom install script
createInstallScript()
{
  local INSTALL_FILE_LOC="${IMPORT_APEX_DIR}/${IMPORT_APEX_APP_INSTALL_FILE_NAME}"

  printStage "Create custom install script"

  generateInstallScriptContent > "${INSTALL_FILE_LOC}"

  if [ -f "${INSTALL_FILE_LOC}" ]
  then
    printStageResult "Done: ${INSTALL_FILE_LOC}"
  else
    printStageResult "ERROR: Failed to create install script."
    exitScript "Y"
  fi
}

# entry point
main()
{
  ## Set Options to Vars
  assignOptsToVars "$@"

  ## Verify given Options
  verifyOptions

  cd $IMPORT_APEX_BASE_DIR_LOC

  ## Create files upload script
  createFilesUploadScript

  ## Create custom install script
  createInstallScript

  exitScript "N"
}

main "$@"
To be able to execute the bash script, you need to make sure that it is executable for the deployment OS user.
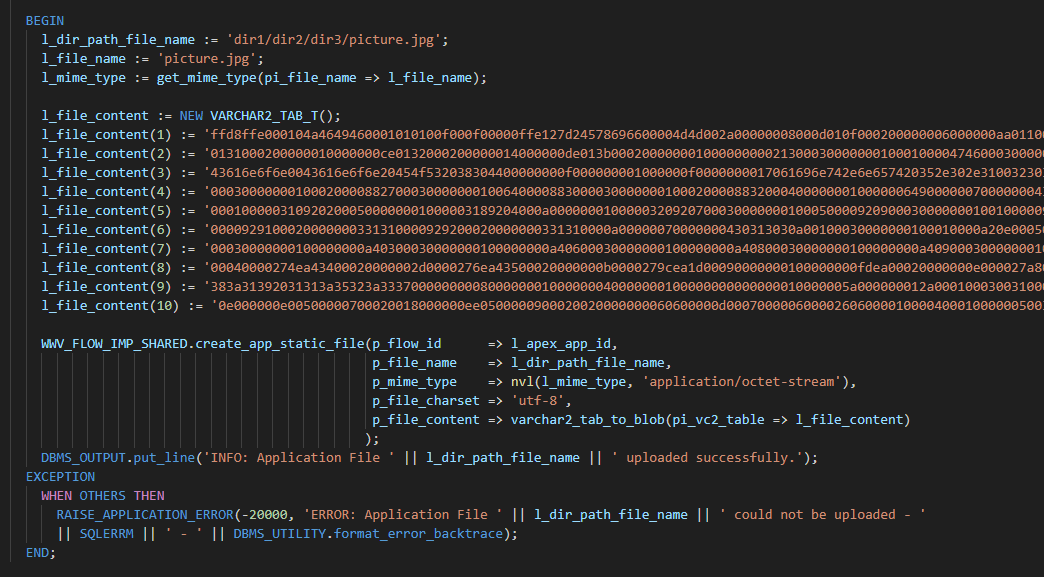
chmod u+x create_custom_install_and_file_upload_scripts.shBefore the installation of the APEX app can be started, the Bash script needs to be executed. It will create two customized SQL files: install_apex_app_with_files.sql and upload_files.sql inside the base directory of the APEX app.
The following screenshot shows an example of the contents of upload_files.sql generated by the Bash script.
All you need to do is to execute the generated install_apex_app_with_files.sql in your database schema during your deployment process. It will install the APEX app first, followed by uploading the workspace and application files to the workspace. The file content can look like this, for example:
BEGIN
  APEX_APPLICATION_INSTALL.generate_offset();
  APEX_APPLICATION_INSTALL.set_application_id(141);
END;
/

PROMPT # Install APEX application
@install.sql

PROMPT # Upload static workspace and application files
@upload_files.sql
Part 1: Export APEX App with workspace and application files in uncoded binary raw data format
Oracle APEX allows you to export applications including all app components as SQL files. This includes application files which binary raw contents are converted into a hexadecimal string representation. This makes it difficult to add, edit or review files from outside an APEX workspace. In this blog post, I would like to show you how you can export an APEX application together with workspace and application files in their binary raw format.
When you export the APEX app over the Workspace Web interface or with SQLcl, the export will only include app related objects but not those for the workspace. Nevertheless, SQLcl provides you a command to export workspace files too.
SQL> apex export -applicationid 141 -expOriginalIds -split
SQL> apex export -workspaceid 19274859372729475 -expOriginalIds -expFiles
The following shows an example of the content of an SQL file including data of an application file when the app got exported with “split” mode. Exported workspace files have a similiar structure, but all file contents are merged to a single export file named like files_19274859372729475.sql
prompt --application/shared_components/files/icons_app_icon_32_png
begin
--   Manifest
--     APP STATIC FILES: 141
--   Manifest End
wwv_flow_imp.component_begin (
 p_version_yyyy_mm_dd=>'2022.10.07'
,p_release=>'22.2.11'
,p_default_workspace_id=>19274859372729475
,p_default_application_id=>141
,p_default_id_offset=>16094782927472913
,p_default_owner=>'DATABASESCHEMA'
);
wwv_flow_imp.g_varchar2_table := wwv_flow_imp.empty_varchar2_table;
wwv_flow_imp.g_varchar2_table(1) := '89504E470D0A1A0A0000000D4948445200000020000000200806000000737A7AF4000000017352474200AECE1CE9000003DB4944415458479D57CB4E534118FE0E050A358458902890B444034408246014909562C2D2C4B54B8DCFE0C28589F804BAD0C4';
wwv_flow_imp.g_varchar2_table(2) := '8D4FA09B920862DC881A1A342A14D4588C1A958B9808A5B43D666EE7CCCC9939A7DA459BCE7FFBFEFB8C333037E3C2051C0770E1C0FB76C10E09919FD35FCA4B45D84790091797A1544FCC610497FF0A39618B02D00EC95F62DAB321191167029A0F8E51';
wwv_flow_imp.g_varchar2_table(3) := '849C0C9B9C3A20B0C4AF647190033079242BB71994704A91D261A95CBE670E1C16015FBD8555512E3C9542C7E82E53558D362F92048094794B3254537690664A30F0BE0B0E4901535F2D6E1B5F98BC89C6AA85A740ADE87F87C2C32F0740AE622530AA76';
wwv_flow_imp.g_varchar2_table(4) := '0A20605069415B01F925EF964AA8ECEC50C69A44024E6D6D50C8D049B4A5590AC2ABC09A7317A8ECEF61B02181743289DFBBBBF8F0731D9F630E9C78BCAA527106E666F9D430F337FFDAC6D1A626EAEEDAD606C68EB4FB4308C0C2C63A46BB7BF0757313';
wwv_flow_imp.g_varchar2_table(5) := 'C54A19E9D643C864B39848A5B0B0FD0B5F128950206A0D184A71B85CC6644F2F55329D5BC6D4C86945E195A74F30D4D5858F6B6B483434E0705B1BE6575771EFCC046E2F66F1A05854A79A90E68D1500A0C38D027069F6114E7477E3DBD6162A950A3A5B';
wwv_flow_imp.g_varchar2_table(6) := '5AF072650577CF9E6300F68BC608881AF50158C6ED90210232EB9D37AF514C1C407D1D293C177BFB65C477FEE072FF006E2D66F19003B036AFBA0BC472F1D9D5082C616A645CF168BBB887AB2FE631984AD3F357F94F983A3982E6FA3803A0A74073544A';
wwv_flow_imp.g_varchar2_table(7) := '81BE09991D1DC08D91716551119EFBEFDEE23DF7F4585D3D2E1EEFA3854A52202260AB4469129A59AC35C083241CBAFEFC195570EDD4A8A7484E81772856BFCB06341F440E5C3E9075F7A28A90CD539E3ACD07B908FD7DE02F2D2AEAEF82E8086472CBB8';
wwv_flow_imp.g_varchar2_table(8) := 'A9B4A16E59FD2F2210BA25061ECFB04168F9B4AEAF23954C526A7E731363ED1D8C93C7DEAC9C1197BEFFC0EAC166BBF2C032E2AC542937C052D04329D3B91CD21D9D8AC242A984D57C1E17FAFB51138B29B44C2E876CAC463AD31611A987401B0A76BE90';
wwv_flow_imp.g_varchar2_table(9) := '86CB254C76F7D23C934998EAE85403E60214C49A0EC24526B7A2010806237217F4158A38DFDFC723B0EC45409F5B85FD20083502C16491BB2A03C0AF52A66491355B2EECB29C1B3E1E104331C41A1BE97A0E1334A6C0D3651CCFE27E6BC5145A744ACF92';
wwv_flow_imp.g_varchar2_table(10) := '5920D631EB53A9BCF93FC531F90D20BF184C970DAA4A7D0B182F66D622A460A4EBA4D188790E88D3A8AB1DAF01F3C3C416C728A52A6C99DB2CA94C42DBDD35EA52FEBF7214AC7E29ADC6C3882A93DE8BE1DAFC36B4F5986586856D80B0688837AAEC809F';
wwv_flow_imp.g_varchar2_table(11) := '025B2547B95BB59CB91ED81C30B457985D45157F79EBFC7E27C8ED4D5EEA0E5CFA8E679FBF36F6013F40676AA90000000049454E44AE426082';
wwv_flow_imp_shared.create_app_static_file(
 p_id=>wwv_flow_imp.id(50871026532675204)
,p_file_name=>'icons/app-icon-32.png'
,p_mime_type=>'image/png'
,p_file_charset=>'utf-8'
,p_file_content => wwv_flow_imp.varchar2_to_blob(wwv_flow_imp.g_varchar2_table)
);
wwv_flow_imp.component_end;
end;
/
Now, let’s see how to export these files in raw format.
Note: For accessing workspace related data, the database user needs to be the owner of the workspace or have been granted the role APEX_ADMINISTRATOR_ROLE.
In the following, we will export the APEX application and all files into the /tmp/ directory. To avoid overwriting by simultaneous executions of the script, you can use a dynamic path instead.
For exporting the files in raw format, you have two options.
| Option | Advantages | Disadvantages |
|---|---|---|
| stdout |
|
|
| UTL_FILE |
|
|
In both scripts below, all workspace files and application files are exported into the path /tmp/apex/application/shared_components/workspace_files and application_files of the APEX application export folder. The directory path structure is retained if the files have been uploaded to directories. If there are no workspace or application files existing, the corresponding directory will not be created. As workspace files are shared resources in a workspace and do not only belong to one application, the export of these files can be removed in the scripts if required.
Example (Static Application Files):
- /dir1/file1.txt
- /dir2/dir2_2/file2.js
- /dir2/dir2_2/file2_2.png
- /file3.txt
These files are exported in the following structure:
..shared_components
  └── application_files
      ├── dir1
      │   └── file1.txt
      ├── dir2
      │   └── dir2_2
      │       ├── file2.js
      │       └── file2_2.png
      └── file3.txt
Option 1: Exporting file contents using stdout
One way to get the raw content of a file would be to select the BLOB data from the database table where the files are stored to retrieve the raw over standard output (stdout). Afterwards, you can save the raw content directly into a file on the file system using Unix commands such as xxd -r -p. This works similiar to the SPOOL command available in SQL*Plus and SQLcl. In this case, you need to make sure to disable all PL/SQL execution messages, column heading information and any kind of echos so that only the raw data contents of files get returned over SQLcl. However, this method may not be stable in case of warning messages are generated by SQLcl itself or general errors by the database, as they cannot be suppressed.
The script below can be used to export files using stdout. You can display available options by providing the “-help” option when calling the script.
sh export_apex_app_with_files_using_stdout.sh -help
#!/bin/bash

# export_apex_app_with_files_using_stdout.sh
#
# This script exports APEX apps with
# workspace and application files in
# their uncoded binary raw format
# using the standard output and xxd

## Global Constants and Settings
readonly EXPORT_APEX_BASE_DIR_LOC="/tmp"
readonly EXPORT_APEX_DIR="apex"
readonly EXPORT_APEX_SHARED_COMPONENTS_PATH="${EXPORT_APEX_BASE_DIR_LOC}/${EXPORT_APEX_DIR}/application/shared_components"
readonly EXPORT_APEX_WORKSPACE_FILES_PATH="${EXPORT_APEX_SHARED_COMPONENTS_PATH}/workspace_files"
readonly EXPORT_APEX_APP_FILES_PATH="${EXPORT_APEX_SHARED_COMPONENTS_PATH}/application_files"

readonly FONT_YELLOW='\033[1;33m'
readonly FONT_NOCOLOR='\033[0m'

# Settings script for returning the BLOB data
readonly SETTINGS_SCRIPT="
WHENEVER SQLERROR EXIT 1;
SET SERVEROUTPUT ON SIZE UNLIMITED
SET FEEDBACK OFF
SET HEADING OFF
SET ECHO OFF
SET PAGESIZE 0
SET LINESIZE 32767
SET TRIMSPOOL ON
SET LONG 900000
"

# Get Workspace Id script
readonly EXPORT_WORKSPACE_ID_SCRIPT="
$SETTINGS_SCRIPT

SELECT TO_CHAR(workspace_id)
FROM apex_applications
WHERE application_id = _APP_ID_;

QUIT;
"

# Get Workspace file contents script
readonly EXPORT_WORKSPACE_FILE_SCRIPT="
$SETTINGS_SCRIPT

SELECT file_content
FROM apex_workspace_static_files
WHERE workspace_id = _WORKSPACE_ID_
AND file_name = '_FILENAME_';

QUIT;
"

# Get Application file contents script
readonly EXPORT_APPLICATION_FILE_SCRIPT="
$SETTINGS_SCRIPT

SELECT file_content
FROM apex_application_static_files
WHERE application_id = _APP_ID_
AND file_name = '_FILENAME_';

QUIT;
"

## Functions

# Help text displayed to user in case of invalid script calls or via -help option
printHelpText()
{
   echo ""
   echo "Usage: $0 -sqlclExec=<\"PATH/TO/SQLCL/BIN/sql\"> -apexAppId=<APEX_APP_ID> -dbHost=<DB_HOST> -dbPort=<DB_PORT> -dbServiceName=<DB_SERVICE_NAME> -dbExecUser=<DB_EXEC_USER> [-dbExecUserPassword=<DB_EXEC_USER_PASSWORD>]"
   echo ""
   echo "Available Options:"
   echo -e "\t${FONT_YELLOW}-sqlclExec${FONT_NOCOLOR}           - Path to executables of SQLcl"
   echo -e "\t${FONT_YELLOW}-apexAppId${FONT_NOCOLOR}           - APEX App Id"
   echo -e "\t${FONT_YELLOW}-dbHost${FONT_NOCOLOR}              - Hostname"
   echo -e "\t${FONT_YELLOW}-dbPort${FONT_NOCOLOR}              - Port"
   echo -e "\t${FONT_YELLOW}-dbServiceName${FONT_NOCOLOR}       - Service Name"
   echo -e "\t${FONT_YELLOW}-dbExecUser${FONT_NOCOLOR}          - User"
   echo -e "\t${FONT_YELLOW}-dbExecUserPassword${FONT_NOCOLOR}  - Password (optional; password prompt will be displayed)"
   echo -e "\t${FONT_YELLOW}-help${FONT_NOCOLOR}                - Prints this help text"
   echo ""
}

# Assigns given option args to vars
assignOptsToVars()
{
  while [ "$1" != "" ];
  do
    opt=`echo $1 | awk -F= '{print $1}'`
    optarg=`echo $1 | awk -F= '{print $2}'`
    case "$opt" in
      -help ) printHelpText
              exit ;;
      -sqlclExec ) SQLCL_EXEC="$optarg" ;;
      -apexAppId ) APP_ID="$optarg" ;;
      -dbHost ) DB_HOST="$optarg" ;;
      -dbPort ) DB_PORT="$optarg" ;;
      -dbServiceName ) DB_SERVICE="$optarg" ;;
      -dbExecUser ) DB_USERNAME="$optarg" ;;
      -dbExecUserPassword ) DB_PASSWORD="$optarg" ;;
      * ) echo "ERROR: Unknown option provided: \"$opt\"."
          echo ""
          printHelpText
          exit 1 ;;
    esac
    shift
  done
}

# Verifies given option args
verifyOptions()
{
  if [ "$DB_USERNAME" != "" ] && [ "$DB_PASSWORD" == "" ]; then
    stty -echo
    read -p "Enter Password of User ${DB_USERNAME}: " DB_PASSWORD
    stty echo
    echo ""
  fi

  if [ "$SQLCL_EXEC" == "" ] || [ "$APP_ID" == "" ] || [ "$DB_HOST" == "" ] || [ "$DB_PORT" == "" ] || [ "$DB_SERVICE" == "" ] || [ "$DB_USERNAME" == "" ] || [ "$DB_PASSWORD" == "" ]; then
    echo "ERROR: Please provide all necessary option arguments. Use -help to show a list of all options."
    echo ""
    exit 1
  fi
}

# Prints Stage to output
printStage()
{
   echo ""
   echo "#"
   echo "# $1"
   echo "#"
   echo ""
}

# Prints Stage Result to output
printStageResult()
{
   echo ""
   echo ".. $1"
   echo ""
}

# Prints Step to output
printStep()
{
   echo ".... $1"
}

# Prints Step Result to output
printStepResult()
{
   echo "........ $1"
}

# Cleans up dirs in case of Errors or script termination
cleanup()
{
   local CLEANUP_ALL="$1"

   if [[ -f "${EXPORT_APEX_BASE_DIR_LOC}/files_${WORKSPACE_ID}.sql" ]]; then rm "${EXPORT_APEX_BASE_DIR_LOC}/files_${WORKSPACE_ID}.sql"; fi
   if [[ -d "${EXPORT_APEX_BASE_DIR_LOC}/f${APP_ID}" ]]; then rm -rf "${EXPORT_APEX_BASE_DIR_LOC}/f${APP_ID}"; fi

   if [ "$CLEANUP_ALL" == "N" ]
   then
     if [[ -d "${EXPORT_APEX_SHARED_COMPONENTS_PATH}/files" ]]; then rm -rf "${EXPORT_APEX_SHARED_COMPONENTS_PATH}/files"; fi
   else
     if [[ -d "${EXPORT_APEX_BASE_DIR_LOC}/${EXPORT_APEX_DIR}" ]]; then rm -rf "${EXPORT_APEX_BASE_DIR_LOC}/${EXPORT_APEX_DIR}"; fi
   fi
}

# exits script with error or success
exitScript()
{
   local EXIT_WITH_ERROR="$1"

   if [ "$EXIT_WITH_ERROR" == "Y" ]
   then
     echo "Some scripts failed."
     exit 1
   else
     echo "Finished."
     exit 0
   fi
}

# Tests the database connection
testDatabaseConnection()
{
  echo "exit" | "$SQLCL_EXEC" -L "${DB_USERNAME}/${DB_PASSWORD}@${DB_HOST}:${DB_PORT}/${DB_SERVICE}" | grep -q "ORA-" > /dev/null

  if [ $? -eq 0 ]
  then
    echo "ERROR: The database connection test failed. Please check the user credentials."
    exitScript "Y"
  fi
}

# Determine workspace id
determineWorkspaceId()
{
   local EXPORT_WORKSPACE_ID_SCRIPT_MOD="${EXPORT_WORKSPACE_ID_SCRIPT/_APP_ID_/$APP_ID}"
   local SCRIPT_FAILED

   printStage "Determine Workspace ID"

   WORKSPACE_ID=$("$SQLCL_EXEC" -s "${DB_USERNAME}/${DB_PASSWORD}@${DB_HOST}:${DB_PORT}/${DB_SERVICE}" <<< "$EXPORT_WORKSPACE_ID_SCRIPT_MOD")

   if [ $? -eq 0 ]
   then
     WORKSPACE_ID=$(echo "$WORKSPACE_ID" | grep -oP "\d*")
     if [[ "$WORKSPACE_ID" =~ ^[[:digit:]]{6,}$ ]]
     then
       printStageResult "Done: ${WORKSPACE_ID}."
     else
       SCRIPT_FAILED="Y"
     fi
   else
    SCRIPT_FAILED="Y"
   fi

   if [ "$SCRIPT_FAILED" == "Y" ]
   then
    printStageResult "ERROR: Failed to get Workspace ID."
    cleanup "Y"
    exitScript "Y"
   fi
}

# Exports APEX application with application static files
exportApplicationWithEncodedFiles()
{
   printStage "SQLcl: Export APEX Application with Static Application Files (hex encoded)"

   "$SQLCL_EXEC" -s 2>&1 "${DB_USERNAME}/${DB_PASSWORD}@${DB_HOST}:${DB_PORT}/${DB_SERVICE}" <<< "apex export -applicationid ${APP_ID} -skipExportDate -expOriginalIds -split"

   if [ -d "f${APP_ID}" ]
   then
    printStageResult "Done."
   else
    printStageResult "ERROR: Failed to export APEX application."
    cleanup "Y"
    exitScript "Y"
   fi

   # Rename export app folder
   mv "f${APP_ID}" "$EXPORT_APEX_DIR"
}

# Exports hex encoded workspace static files
exportEncodedWorkspaceFiles()
{
   printStage "SQLcl: Export APEX Static Workspace Files (hex encoded)"

   "$SQLCL_EXEC" -s 2>&1 "${DB_USERNAME}/${DB_PASSWORD}@${DB_HOST}:${DB_PORT}/${DB_SERVICE}" <<< "apex export -workspaceid ${WORKSPACE_ID} -expOriginalIds -expFiles"

   if [ -f "files_${WORKSPACE_ID}.sql" ]
   then
    printStageResult "Done."
   else
    printStageResult "ERROR: Failed to export APEX Static Workspace Files."
    cleanup "Y"
    exitScript "Y"
   fi
}

# Exports binary raw workspace files
exportBinaryRawWorkspaceFiles()
{
   local EXPORT_WORKSPACE_FILE_SCRIPT_MOD
   local BLOB
   local FILEPATH

   printStage "SQLcl: Export APEX Static Workspace Files (binary raw)"

   # Create directory for workspace files
   mkdir -p "$EXPORT_APEX_WORKSPACE_FILES_PATH"

   # loop through exported workspace static files script
   grep -oPs "(?<=,p_file_name=>').*(?=')" "files_${WORKSPACE_ID}.sql" | while IFS= read -r FILENAME
   do
    printStep "Found Workspace File: ${FILENAME}"
    EXPORT_WORKSPACE_FILE_SCRIPT_MOD="${EXPORT_WORKSPACE_FILE_SCRIPT/_WORKSPACE_ID_/$WORKSPACE_ID}"
    EXPORT_WORKSPACE_FILE_SCRIPT_MOD="${EXPORT_WORKSPACE_FILE_SCRIPT_MOD/_FILENAME_/$FILENAME}"
    BLOB=$("$SQLCL_EXEC" -s "${DB_USERNAME}/${DB_PASSWORD}@${DB_HOST}:${DB_PORT}/${DB_SERVICE}" <<< "$EXPORT_WORKSPACE_FILE_SCRIPT_MOD")
     if [ $? -eq 0 ] && [[ $BLOB ]]
     then
      FILEPATH=$(dirname "${EXPORT_APEX_WORKSPACE_FILES_PATH}/${FILENAME}")
      mkdir -p "$FILEPATH"
      if ! xxd -r -p <<< "$BLOB" > "${EXPORT_APEX_WORKSPACE_FILES_PATH}/${FILENAME}"; then
        printStepResult "ERROR: Workspace File ${FILENAME} could not be created."
        exit 1
      else
        printStepResult "Workspace File ${FILENAME} created."
      fi
     else
      printStepResult "ERROR: BLOB data of File ${FILENAME} could not be returned via standard output."
      exit 1
     fi
   done

   if [ $? -eq 0 ]
   then
    printStageResult "Done."
   else
    printStageResult "ERROR: Failed to export APEX Static Workspace File BLOB data."
    cleanup "Y"
    exitScript "Y"
   fi
}

# Exports binary raw application files
exportBinaryRawApplicationFiles()
{
   local EXPORT_APPLICATION_FILE_SCRIPT_MOD
   local BLOB
   local FILEPATH

   printStage "SQLcl: Export APEX Static Application Files (binary raw)"

   # Create directory for application files
   mkdir -p "$EXPORT_APEX_APP_FILES_PATH"

   # loop through exported application static files scripts
   for FILE in $(find ${EXPORT_APEX_SHARED_COMPONENTS_PATH}/files/* -type f -name '*.sql');
   do
    grep -oPs "(?<=,p_file_name=>').*(?=')" "$FILE" | while IFS= read -r FILENAME
     do
      printStep "Found Application File: ${FILENAME}"
      EXPORT_APPLICATION_FILE_SCRIPT_MOD="${EXPORT_APPLICATION_FILE_SCRIPT/_APP_ID_/$APP_ID}"
      EXPORT_APPLICATION_FILE_SCRIPT_MOD="${EXPORT_APPLICATION_FILE_SCRIPT_MOD/_FILENAME_/$FILENAME}"
      BLOB=$("$SQLCL_EXEC" -s "${DB_USERNAME}/${DB_PASSWORD}@${DB_HOST}:${DB_PORT}/${DB_SERVICE}" <<< "$EXPORT_APPLICATION_FILE_SCRIPT_MOD")
      if [ $? -eq 0 ] && [[ $BLOB ]]
      then
       FILEPATH=$(dirname "${EXPORT_APEX_APP_FILES_PATH}/${FILENAME}")
       mkdir -p "$FILEPATH"
       if ! xxd -r -p <<< "$BLOB" > "${EXPORT_APEX_APP_FILES_PATH}/${FILENAME}"; then
         printStepResult "ERROR: Application File ${FILENAME} could not be created."
         exit 1
       else
         printStepResult "Application File ${FILENAME} created."
       fi
      else
       printStepResult "ERROR: BLOB data of File ${FILENAME} could not be returned via standard output."
       exit 1
      fi
     done
   done

   if [ $? -eq 0 ]
   then
    printStageResult "Done."
   else
    printStageResult "ERROR: Failed to export APEX Static Application File BLOB data."
    cleanup "Y"
    exitScript "Y"
   fi
}

# Adjusts install.sql file of APEX app export
adjustInstallFile()
{
   printStage "Remove references to hex encoded files from install.sql script of APEX application export"

   # Remove calling of single app files inside install.sql
   find "${EXPORT_APEX_DIR}" -type f -name "install.sql" -exec sed -i -e '/^@@application\/shared_components\/files/d' {} +

   if [ $? -eq 0 ]
   then
    printStageResult "Done."
   else
    printStageResult "ERROR: Failed to remove file references."
    cleanup "Y"
    exitScript "Y"
   fi
}

# entry point
main()
{
  ## Set Options to Vars
  assignOptsToVars "$@"

  ## Verify given Options
  verifyOptions

  ## Test the database connection
  testDatabaseConnection

  cd $EXPORT_APEX_BASE_DIR_LOC

  ## Clean up before
  cleanup "Y"

  ## Determine Workspace Id
  determineWorkspaceId

  ## Export APEX application with app files (encoded)
  exportApplicationWithEncodedFiles

  ## Workspace files export (encoded)
  exportEncodedWorkspaceFiles

  ## Export binary raw files
  exportBinaryRawWorkspaceFiles
  exportBinaryRawApplicationFiles

  ## Adjust APEX install.sql script
  adjustInstallFile

  cleanup "N"
  exitScript "N"
}

main "$@"
Option 2: Exporting file contents using UTL_FILE
Another way would be to export the files within PL/SQL context only. Since Oracle 7.3, the Oracle package UTL_FILE can be used to create, read and write a file on the underlying file system. For this, you need to create a directory object which you specify when calling UTL_FILE.fopen(). If you want to define the files location dynamically, you need to create the directory objects during script execution. In this case, the database user needs to have the CREATE ANY DIRECTORY and DROP ANY DIRECTORY privileges with read/write permissions.
CREATE DIRECTORY DIRECTORY_EXPORT_WORKSPACE_FILES AS '/tmp/apex/application/shared_components/workspace_files';
CREATE DIRECTORY DIRECTORY_EXPORT_APP_FILES AS '/tmp/apex/application/shared_components/application_files';

GRANT READ, WRITE ON DIRECTORY DIRECTORY_EXPORT_WORKSPACE_FILES TO {dbSchema};
GRANT READ, WRITE ON DIRECTORY DIRECTORY_EXPORT_APP_FILES TO {dbSchema};
The following bash script can be used to export the APEX application and files to /tmp/apex/ using the UTL_FILE package. Please note that, as mentioned above, this script requires a privileged DB User for creation of dynamic directory objects. You can display available options by providing the “-help” option when calling the script.
sh export_apex_app_with_files_using_utl_file.sh -help
#!/bin/bash

# export_apex_app_with_files_using_utl_file.sh
#
# This script exports APEX apps with
# workspace and application files in
# their uncoded binary raw format
# using the PL/SQL UTL_FILE package

## Global Constants and Settings
readonly EXPORT_APEX_BASE_DIR_LOC="/tmp"
readonly EXPORT_APEX_DIR="apex"
readonly EXPORT_APEX_SHARED_COMPONENTS_PATH="${EXPORT_APEX_BASE_DIR_LOC}/${EXPORT_APEX_DIR}/application/shared_components"
readonly EXPORT_APEX_WORKSPACE_FILES_DIR_NAME="workspace_files"
readonly EXPORT_APEX_APPLICATION_FILES_DIR_NAME="application_files"
readonly EXPORT_APEX_WORKSPACE_FILES_DIR_OBJECT="DIRECTORY_EXPORT_WORKSPACE_FILES"
readonly EXPORT_APEX_APPLICATION_FILES_DIR_OBJECT="DIRECTORY_EXPORT_APP_FILES"

readonly FONT_YELLOW='\033[1;33m'
readonly FONT_NOCOLOR='\033[0m'

# Script to create directory objects for each dir
readonly CREATE_DRECTORY_OBJECTS_SCRIPT="
WHENEVER SQLERROR EXIT 1;
SET SERVEROUTPUT ON SIZE UNLIMITED
SET FEEDBACK OFF

DECLARE
  c_directory                  CONSTANT VARCHAR2(50) := '_EXPORT_APEX_SHARED_COMPONENTS_PATH_/';
  TYPE VARCHAR2_TAB_T          IS TABLE OF VARCHAR2(4000);

  l_workspace_id               NUMBER;
  l_directory_object           VARCHAR2(50);
  l_directory                  VARCHAR2(70);
  l_directories                VARCHAR2(1000);
  l_dir_object_workspace_files VARCHAR2(50)   := '_EXPORT_APEX_WORKSPACE_FILES_DIR_OBJECT_';
  l_dir_object_app_files       VARCHAR2(50)   := '_EXPORT_APEX_APPLICATION_FILES_DIR_OBJECT_';
  l_dir_workspace_files        VARCHAR2(70)   := c_directory || '_EXPORT_APEX_WORKSPACE_FILES_DIR_NAME_';
  l_dir_application_files      VARCHAR2(70)   := c_directory || '_EXPORT_APEX_APPLICATION_FILES_DIR_NAME_';
  l_directory_objects_table    VARCHAR2_TAB_T := NEW VARCHAR2_TAB_T();

  l_apex_app_id                NUMBER         :=  _APEX_APP_ID_;
  l_db_running_user            VARCHAR2(50)   := '_DB_RUNNING_USER_';
  l_db_privileged_user         VARCHAR2(50)   := '_DB_PRIVILEGED_USER_';
BEGIN
  SELECT workspace_id
  INTO l_workspace_id
  FROM apex_applications
  WHERE application_id = l_apex_app_id;

  -- Get all directory paths of files
  FOR c_directories IN (SELECT flow_id,
                               file_path,
                               rtrim(upper(replace(file_path, '/', '_')), '_') as file_path_name
                        FROM (SELECT flow_id,
                                     regexp_replace(file_name, '[^/]+$', '') as file_path
                              FROM (SELECT 0 as flow_id,
                                           file_name
                                    FROM apex_workspace_static_files
                                    WHERE workspace_id = l_workspace_id
                                  UNION ALL
                                    SELECT application_id as flow_id,
                                           file_name
                                    FROM apex_application_static_files
                                    WHERE application_id = l_apex_app_id
                                   )
                              ORDER BY flow_id ASC
                              )
                        GROUP BY flow_id, file_path
  ) LOOP

    BEGIN
      IF c_directories.flow_id = 0
      THEN
         l_directory_object := l_dir_object_workspace_files;
         l_directory := l_dir_workspace_files;
      ELSE
         l_directory_object := l_dir_object_app_files;
         l_directory := l_dir_application_files;
      END IF;

      IF c_directories.file_path IS NOT NULL
      THEN
        l_directory_object := l_directory_object || '_' || c_directories.file_path_name;
        l_directory := l_directory || '/' || c_directories.file_path;
      END IF;

      EXECUTE IMMEDIATE '
          CREATE DIRECTORY
               ' || l_directory_object || '
          AS ''' || l_directory || '''
      ';

      -- Save directory names temporarily in case of errors
      l_directory_objects_table.extend;
      l_directory_objects_table(l_directory_objects_table.last) := l_directory_object;

      l_directories := l_directories || ':' || l_directory;

      IF upper(l_db_running_user) != upper(l_db_privileged_user)
      THEN
        EXECUTE IMMEDIATE '
            GRANT READ, WRITE ON DIRECTORY
               ' || l_directory_object || '
            TO ' || l_db_running_user || '
        ';
      END IF;

    EXCEPTION
      WHEN OTHERS THEN
        -- Drop all previously created directories
        FOR c_dir in l_directory_objects_table.FIRST .. l_directory_objects_table.LAST
        LOOP
          BEGIN
            EXECUTE IMMEDIATE 'DROP DIRECTORY ' || l_directory_objects_table(c_dir) || '';
          EXCEPTION
            WHEN OTHERS THEN
              CONTINUE;
          END;
        END LOOP;
        RAISE;
    END;

  END LOOP;

  DBMS_OUTPUT.put_line(ltrim(l_directories, ':'));
END;
/

QUIT;
"

# Script for cleanup directory objects
readonly DROP_DRECTORY_OBJECTS_SCRIPT="
SET FEEDBACK OFF

DECLARE
  l_dir_object_workspace_files VARCHAR2(50)   := '_EXPORT_APEX_WORKSPACE_FILES_DIR_OBJECT_';
  l_dir_object_app_files       VARCHAR2(50)   := '_EXPORT_APEX_APPLICATION_FILES_DIR_OBJECT_';
BEGIN
  FOR c_directories IN (SELECT directory_name
                        FROM all_directories
                        WHERE (   directory_name LIKE l_dir_object_workspace_files || '%'
                               OR directory_name LIKE l_dir_object_app_files || '%'
                              )
  ) LOOP

    BEGIN
      EXECUTE IMMEDIATE 'DROP DIRECTORY ' || c_directories.directory_name || '';
    EXCEPTION
      WHEN OTHERS THEN
        CONTINUE;
    END;

  END LOOP;
END;
/

QUIT;
"

# Custom PL/SQL export script
readonly EXPORT_FILES_SCRIPT="
WHENEVER SQLERROR EXIT 1;
WHENEVER OSERROR EXIT 2;
SET FEEDBACK OFF

DECLARE
  l_file                       UTL_FILE.FILE_TYPE;
  l_buffer                     RAW(32767);
  l_amount                     BINARY_INTEGER := 32767;
  l_position                   NUMBER         := 1;
  l_blob_length                NUMBER;
  l_workspace_id               NUMBER;
  l_directory_object           VARCHAR2(50);
  l_dir_object_workspace_files VARCHAR2(50)   := '_EXPORT_APEX_WORKSPACE_FILES_DIR_OBJECT_';
  l_dir_object_app_files       VARCHAR2(50)   := '_EXPORT_APEX_APPLICATION_FILES_DIR_OBJECT_';

  l_apex_app_id                NUMBER         :=  _APEX_APP_ID_;
BEGIN
  SELECT workspace_id
  INTO l_workspace_id
  FROM apex_applications
  WHERE application_id = l_apex_app_id;

  -- Get all files accessable in the workspace
  /*
   * Alternatively accessable over wwv_flow_files:
   *
   * You need to set the security group id first.
   *
   * APEX_UTIL.set_workspace('<WorkspaceName>');
   *
   * wwv_flow_files.flow_id:
   *   = 0 - workspace file
   *   > 0 - application file
   */

  FOR c_files IN (SELECT flow_id,
                         file_content,
                         file_path,
                         rtrim(upper(replace(file_path, '/', '_')), '_') as file_path_name,
                         path_file_name,
                         regexp_substr(path_file_name, '[^/]*$') as file_name
                    FROM (SELECT flow_id,
                                 file_content,
                                 regexp_replace(file_name, '[^/]+$', '') as file_path,
                                 file_name as path_file_name
                          FROM (SELECT 0 as flow_id,
                                       file_content,
                                       file_name
                                FROM apex_workspace_static_files
                                WHERE workspace_id = l_workspace_id
                              UNION ALL
                                SELECT application_id as flow_id,
                                       file_content,
                                       file_name
                                FROM apex_application_static_files
                                WHERE application_id = l_apex_app_id
                               )
                          )
                    ORDER BY flow_id ASC
  ) LOOP

    BEGIN
      IF c_files.flow_id = 0
      THEN
         l_directory_object := l_dir_object_workspace_files;
      ELSE
         l_directory_object := l_dir_object_app_files;
      END IF;

      IF c_files.file_path IS NOT NULL
      THEN
        l_directory_object := l_directory_object || '_' || c_files.file_path_name;
      END IF;

      -- Create and open file in write byte mode (binary) within directory
      l_file := UTL_FILE.fopen(l_directory_object, c_files.file_name, 'wb', 32767);

      -- Get length of BLOB, read bytes based on max chunk size and write it to file on OS
      l_blob_length := DBMS_LOB.getlength(c_files.file_content);

      WHILE l_position <= l_blob_length
      LOOP
        DBMS_LOB.read(c_files.file_content, l_amount, l_position, l_buffer);
        UTL_FILE.put_raw(l_file, l_buffer, TRUE);
        l_position := l_position + l_amount;
      END LOOP;

      l_position := 1;

      UTL_FILE.fclose(l_file);
    EXCEPTION
      WHEN OTHERS THEN
        IF UTL_FILE.is_open(l_file)
        THEN
          UTL_FILE.fclose(l_file);
        END IF;
        RAISE;
    END;

  END LOOP;

END;
/

QUIT;
"

## Functions

# Help text displayed to user in case of invalid script calls or via -help option
printHelpText()
{
   echo ""
   echo "Usage: $0 -sqlclExec=<\"PATH/TO/SQLCL/BIN/sql\"> -apexAppId=<APEX_APP_ID> -dbHost=<DB_HOST> -dbPort=<DB_PORT> -dbServiceName=<DB_SERVICE_NAME> [-dbPrivUser=<DB_PRIV_USER> -dbPrivUserPassword=<DB_PRIV_USER_PASSWORD>] -dbExecUser=<DB_EXEC_USER> [-dbExecUserPassword=<DB_EXEC_USER_PASSWORD>]"
   echo ""
   echo "Available Options:"
   echo -e "\t${FONT_YELLOW}-sqlclExec${FONT_NOCOLOR}          - Path to executables of SQLcl"
   echo -e "\t${FONT_YELLOW}-apexAppId${FONT_NOCOLOR}          - APEX App Id"
   echo -e "\t${FONT_YELLOW}-dbHost${FONT_NOCOLOR}             - Hostname"
   echo -e "\t${FONT_YELLOW}-dbPort${FONT_NOCOLOR}             - Port"
   echo -e "\t${FONT_YELLOW}-dbServiceName${FONT_NOCOLOR}      - Service Name"
   echo -e "\t${FONT_YELLOW}-dbPrivUser${FONT_NOCOLOR}         - User with privileges for maintaining Directory Objects (optional; if not specified, user defined by -dbExecUser will be used)"
   echo -e "\t${FONT_YELLOW}-dbPrivUserPassword${FONT_NOCOLOR} - Password of privileged User (optional; password prompt will be displayed)"
   echo -e "\t${FONT_YELLOW}-dbExecUser${FONT_NOCOLOR}         - User"
   echo -e "\t${FONT_YELLOW}-dbExecUserPassword${FONT_NOCOLOR} - Password (optional; password prompt will be displayed)"
   echo -e "\t${FONT_YELLOW}-help${FONT_NOCOLOR}               - Prints this help text"
   echo ""
}

# Assigns given option args to vars
assignOptsToVars()
{
  while [ "$1" != "" ];
  do
    opt=`echo $1 | awk -F= '{print $1}'`
    optarg=`echo $1 | awk -F= '{print $2}'`
    case "$opt" in
      -help ) printHelpText
              exit ;;
      -sqlclExec ) SQLCL_EXEC="$optarg" ;;
      -apexAppId ) APP_ID="$optarg" ;;
      -dbHost ) DB_HOST="$optarg" ;;
      -dbPort ) DB_PORT="$optarg" ;;
      -dbServiceName ) DB_SERVICE="$optarg" ;;
      -dbPrivUser ) DB_PRIV_USERNAME="$optarg" ;;
      -dbPrivUserPassword ) DB_PRIV_PASSWORD="$optarg" ;;
      -dbExecUser ) DB_USERNAME="$optarg" ;;
      -dbExecUserPassword ) DB_PASSWORD="$optarg" ;;
      * ) echo "ERROR: Unknown option provided: \"$opt\"."
          echo ""
          printHelpText
          exit 1 ;;
    esac
    shift
  done
}

# Verifies given option args
verifyOptions()
{
  if [ "$DB_PRIV_USERNAME" != "" ] && [ "$DB_PRIV_PASSWORD" == "" ]; then
    stty -echo
    read -p "Enter Password of privileged User ${DB_PRIV_USERNAME}: " DB_PRIV_PASSWORD
    stty echo
    echo ""
  fi
  if [ "$DB_USERNAME" != "" ] && [ "$DB_PASSWORD" == "" ]; then
    stty -echo
    read -p "Enter Password of User ${DB_USERNAME}: " DB_PASSWORD
    stty echo
    echo ""
  fi
  if [ "$DB_USERNAME" != "" ] && [ "$DB_PRIV_USERNAME" == "" ]; then
    DB_PRIV_USERNAME="$DB_USERNAME"
    DB_PRIV_PASSWORD="$DB_PASSWORD"
  fi

  if [ "$SQLCL_EXEC" == "" ] || [ "$APP_ID" == "" ] || [ "$DB_HOST" == "" ] || [ "$DB_PORT" == "" ] || [ "$DB_SERVICE" == "" ] || [ "$DB_USERNAME" == "" ] || [ "$DB_PASSWORD" == "" ]; then
    echo "ERROR: Please provide all necessary option arguments. Use -help to show a list of all options."
    echo ""
    exit 1
  fi
}

# Prints Stage to output
printStage()
{
  echo ""
  echo "#"
  echo "# $1"
  echo "#"
  echo ""
}

# Prints Stage Result to output
printStageResult()
{
  echo ""
  echo ".. $1"
  echo ""
}

# Prints Step to output
printStep()
{
  echo ".... $1"
}

# Prints Step Result to output
printStepResult()
{
  echo "........ $1"
}

# Cleans up dirs and Directory Objects in case of Errors or script termination
cleanup()
{
  local DROP_DRECTORY_OBJECTS_SCRIPT_MOD="${DROP_DRECTORY_OBJECTS_SCRIPT/_EXPORT_APEX_WORKSPACE_FILES_DIR_OBJECT_/$EXPORT_APEX_WORKSPACE_FILES_DIR_OBJECT}"
        DROP_DRECTORY_OBJECTS_SCRIPT_MOD="${DROP_DRECTORY_OBJECTS_SCRIPT_MOD/_EXPORT_APEX_APPLICATION_FILES_DIR_OBJECT_/$EXPORT_APEX_APPLICATION_FILES_DIR_OBJECT}"
  local CLEANUP_ALL="$1"

  # Clean up directories
  if [[ -d "${EXPORT_APEX_BASE_DIR_LOC}/f${APP_ID}" ]]; then rm -rf "${EXPORT_APEX_BASE_DIR_LOC}/f${APP_ID}"; fi

  # Drop Directory Objects
  "$SQLCL_EXEC" -s 2>&1 "${DB_PRIV_USERNAME}/${DB_PRIV_PASSWORD}@${DB_HOST}:${DB_PORT}/${DB_SERVICE}" <<< "$DROP_DRECTORY_OBJECTS_SCRIPT_MOD"

   if [ "$CLEANUP_ALL" == "N" ]
   then
     if [[ -d "${EXPORT_APEX_SHARED_COMPONENTS_PATH}/files" ]]; then rm -rf "${EXPORT_APEX_SHARED_COMPONENTS_PATH}/files"; fi
   else
     if [[ -d "${EXPORT_APEX_BASE_DIR_LOC}/${EXPORT_APEX_DIR}" ]]; then rm -rf "${EXPORT_APEX_BASE_DIR_LOC}/${EXPORT_APEX_DIR}"; fi
   fi
}

# exits script with error or success
exitScript()
{
  local EXIT_WITH_ERROR="$1"

  if [ "$EXIT_WITH_ERROR" == "Y" ]
  then
     echo "Some scripts failed."
     exit 1
  else
     echo "Finished."
     exit 0
  fi
}

# Tests the database connection
testDatabaseConnection()
{
  echo "exit" | "$SQLCL_EXEC" -L "${DB_USERNAME}/${DB_PASSWORD}@${DB_HOST}:${DB_PORT}/${DB_SERVICE}" | grep -q "ORA-" > /dev/null

  if [ $? -eq 0 ]
  then
    echo "ERROR: The database connection test failed for user ${DB_USERNAME}. Please check the user credentials."
    exitScript "Y"
  fi

  if [ $DB_PRIV_USERNAME != $DB_USERNAME ]
  then
    echo "exit" | "$SQLCL_EXEC" -L "${DB_PRIV_USERNAME}/${DB_PRIV_PASSWORD}@${DB_HOST}:${DB_PORT}/${DB_SERVICE}" | grep -q "ORA-" > /dev/null

    if [ $? -eq 0 ]
    then
      echo "ERROR: The database connection test failed for user ${DB_PRIV_USERNAME}. Please check the user credentials."
      exitScript "Y"
    fi
  fi
}

# Exports APEX application with application static files
exportApplicationWithEncodedFiles()
{
  printStage "SQLcl: Export APEX Application with Static Application Files (hex encoded)"

  "$SQLCL_EXEC" -s 2>&1 "${DB_USERNAME}/${DB_PASSWORD}@${DB_HOST}:${DB_PORT}/${DB_SERVICE}" <<< "apex export -applicationid ${APP_ID} -skipExportDate -expOriginalIds -split"

  if [ -d "f${APP_ID}" ]
  then
    printStageResult "Done."
  else
    printStageResult "ERROR: Failed to export APEX application."
    cleanup "Y"
    exitScript "Y"
  fi

  # Rename export app folder
  mv "f${APP_ID}" "$EXPORT_APEX_DIR"
}

# Create Directory Objects and paths
createDirectories()
{
  local CREATE_DRECTORY_OBJECTS_SCRIPT_MOD="${CREATE_DRECTORY_OBJECTS_SCRIPT/_APEX_APP_ID_/$APP_ID}"
        CREATE_DRECTORY_OBJECTS_SCRIPT_MOD="${CREATE_DRECTORY_OBJECTS_SCRIPT_MOD/_EXPORT_APEX_WORKSPACE_FILES_DIR_NAME_/$EXPORT_APEX_WORKSPACE_FILES_DIR_NAME}"
        CREATE_DRECTORY_OBJECTS_SCRIPT_MOD="${CREATE_DRECTORY_OBJECTS_SCRIPT_MOD/_EXPORT_APEX_APPLICATION_FILES_DIR_NAME_/$EXPORT_APEX_APPLICATION_FILES_DIR_NAME}"
        CREATE_DRECTORY_OBJECTS_SCRIPT_MOD="${CREATE_DRECTORY_OBJECTS_SCRIPT_MOD/_DB_RUNNING_USER_/$DB_USERNAME}"
        CREATE_DRECTORY_OBJECTS_SCRIPT_MOD="${CREATE_DRECTORY_OBJECTS_SCRIPT_MOD/_DB_PRIVILEGED_USER_/$DB_PRIV_USERNAME}"
        CREATE_DRECTORY_OBJECTS_SCRIPT_MOD="${CREATE_DRECTORY_OBJECTS_SCRIPT_MOD/_EXPORT_APEX_SHARED_COMPONENTS_PATH_/$EXPORT_APEX_SHARED_COMPONENTS_PATH}"
        CREATE_DRECTORY_OBJECTS_SCRIPT_MOD="${CREATE_DRECTORY_OBJECTS_SCRIPT_MOD/_EXPORT_APEX_WORKSPACE_FILES_DIR_OBJECT_/$EXPORT_APEX_WORKSPACE_FILES_DIR_OBJECT}"
        CREATE_DRECTORY_OBJECTS_SCRIPT_MOD="${CREATE_DRECTORY_OBJECTS_SCRIPT_MOD/_EXPORT_APEX_APPLICATION_FILES_DIR_OBJECT_/$EXPORT_APEX_APPLICATION_FILES_DIR_OBJECT}"
  local SCRIPT_OUTPUT
  local PATHS
  local SCRIPT_FAILED

  printStage "SQLcl: Create Directories"

  # Run custom PL/SQL script from above for creating dynamic directory objects
  SCRIPT_OUTPUT=$("$SQLCL_EXEC" -s "${DB_PRIV_USERNAME}/${DB_PRIV_PASSWORD}@${DB_HOST}:${DB_PORT}/${DB_SERVICE}" <<< "$CREATE_DRECTORY_OBJECTS_SCRIPT_MOD")

  if [ $? -eq 0 ]
  then
    SCRIPT_OUTPUT=$(echo -n "$SCRIPT_OUTPUT" | tr -d '\n')
    # Check if directory paths have no spaces
    if [ "$SCRIPT_OUTPUT" == "${SCRIPT_OUTPUT%[[:space:]]*}" ]
    then
      # For each directory path returned from database, create directory path on OS file system
      IFS=":" read -ra PATHS <<< "$SCRIPT_OUTPUT"
      for i in "${PATHS[@]}"
      do
        printStep "Returned Path: ${i}"
        mkdir -p "$i"
        if [ $? -eq 0 ]
        then
          printStepResult "Path ${i} created."
        else
          printStepResult "ERROR: Path ${i} could not be created."
          SCRIPT_FAILED="Y"
          break
        fi
      done
    else
      SCRIPT_FAILED="Y"
    fi
  else
    SCRIPT_FAILED="Y"
  fi

  if [ "$SCRIPT_FAILED" != "Y" ]
  then
    printStageResult "Done."
  else
    printStageResult "ERROR: Failed to create directories."
    cleanup "Y"
    exitScript "Y"
  fi
}

# Export binary raw files
exportBinaryRawFiles()
{
  local EXPORT_FILES_SCRIPT_MOD="${EXPORT_FILES_SCRIPT/_APEX_APP_ID_/$APP_ID}"
        EXPORT_FILES_SCRIPT_MOD="${EXPORT_FILES_SCRIPT_MOD/_EXPORT_APEX_WORKSPACE_FILES_DIR_OBJECT_/$EXPORT_APEX_WORKSPACE_FILES_DIR_OBJECT}"
        EXPORT_FILES_SCRIPT_MOD="${EXPORT_FILES_SCRIPT_MOD/_EXPORT_APEX_APPLICATION_FILES_DIR_OBJECT_/$EXPORT_APEX_APPLICATION_FILES_DIR_OBJECT}"

  printStage "SQLcl: Export APEX Static Workspace and Application Files (binary raw)"

  # Run custom PL/SQL script from above for exporting app and workspace files
  "$SQLCL_EXEC" -s "${DB_USERNAME}/${DB_PASSWORD}@${DB_HOST}:${DB_PORT}/${DB_SERVICE}" <<< "$EXPORT_FILES_SCRIPT_MOD"

  if [ $? -eq 0 ]
  then
    printStageResult "Done."
  else
    printStageResult "ERROR: Failed to export binary raw Files."
    cleanup "Y"
    exitScript "Y"
  fi
}

# Adjusts install.sql file of APEX app export
adjustInstallFile()
{
  printStage "Remove references to hex encoded files from install.sql script of APEX application export"

  # Remove calling of single app files inside install.sql
  find "${EXPORT_APEX_DIR}" -type f -name "install.sql" -exec sed -i -e '/^@@application\/shared_components\/files/d' {} +

  if [ $? -eq 0 ]
  then
    printStageResult "Done."
  else
    printStageResult "ERROR: Failed to remove file references."
    cleanup "Y"
    exitScript "Y"
  fi
}

# entry point
main()
{
  ## Set Options to Vars
  assignOptsToVars "$@"

  ## Verify given Options
  verifyOptions

  ## Test database connection
  testDatabaseConnection

  cd $EXPORT_APEX_BASE_DIR_LOC

  ## Clean up before
  cleanup "Y"

  ## Export APEX application with app files (encoded)
  exportApplicationWithEncodedFiles

  ## Create Directory Objects and paths
  createDirectories

  ## Export binary raw files
  exportBinaryRawFiles

  ## Adjust APEX install.sql script
  adjustInstallFile

  cleanup "N"
  exitScript "N"
}

main "$@"
To be able to execute the bash scripts, you need to make sure that the script you are using is executable for the OS user.
chmod u+x export_apex_app_with_files_using_stdout.sh
chmod u+x export_apex_app_with_files_using_utl_file.sh
You now have the APEX app and all application and workspace files exported to /tmp/apex/, and you can save it in your version control system.
In the following blog post Part 2: Import binary raw data files during APEX App Import, I will show a way how to import the raw files during App import.
How to reduce Merge Conflicts of exported APEX Apps
When exporting an APEX app by a tool like SQLcl splitted in separated files, each SQL file will include arguments inside the Metadata export which can differ when exporting from different APEX instances. Depending on the amount of generated files, this may cause a huge number of merge conflicts when versioning the exported app in a version control system like Git or Apache SVN, which have to be resolved manually. In this blog post, I would like to show an example how to reduce the amount of conflicts.
If you are using a tool for exporting the Apps, you may include a script which removes information that is not needed (or could be replaced) during an import. Most of the merge conflicts are caused by arguments like “p_default_id_offset” as well as “Manifest” information. While the Offset depends on the APEX instance from which you have exported, the Manifest gives various information about a single application component, and therefore usually remains identical. However, if different Application IDs are used on multiple APEX instances for the same application, some of this information (which relates to these IDs) may also differ between exports.
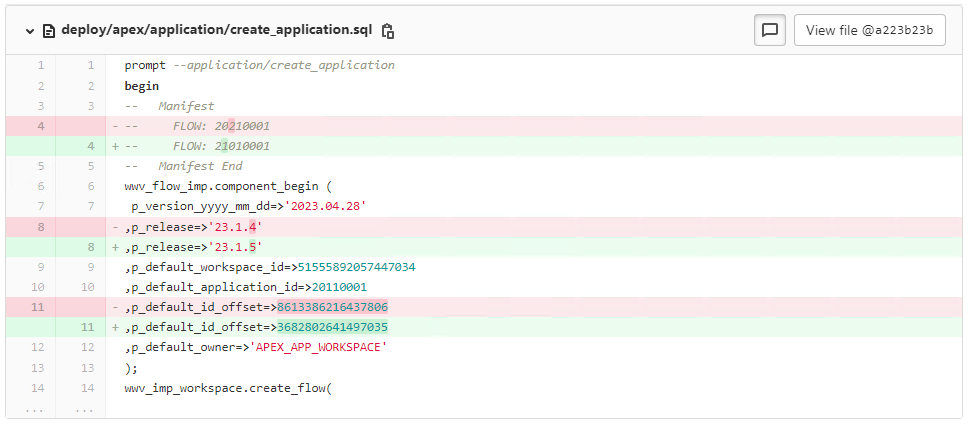
Based on the components your APEX app consists of, the folder structure can look different. While the application folder will always exist and which stores all application resources, including pages, build options, files and other related logics, your export could also include other folders like workspace. This is the case if you are using workspace related resources inside your application logics (e.g. Web credentials).
The Bash script below will do the following actions for all SQL files inside the given subfolders:
- Remove all Manifest information
- Replace any value for Default Offset Id with 0
#!/bin/bash

# Go into the apex folder of application
# this is where the install.sql file is located
# Then run below commands for all sql files in specified subfolders

# Adjustments:
#   Manifest:  Delete every Manifest information
#   Offset Id: Replace any value of p_default_id_offset with 0

APEX_APP_BASE_FOLDER="apex"
APEX_APP_SEARCH_SUBFOLDERS=("application" "workspace")

for subfolder in "${APEX_APP_SEARCH_SUBFOLDERS[@]}"
do
    if [ -d ./"$APEX_APP_BASE_FOLDER"/"$subfolder" ]; then
       find ./"$APEX_APP_BASE_FOLDER"/"$subfolder" -type f -name "*.sql" -exec sed -i -e '/--   Manifest/,/--   Manifest End/d' -i -e 's/p_default_id_offset.*/p_default_id_offset=>0/g' {} +
    fi
done
The Manifest contains information about to which resource the component belongs to (e.g. App Id). This information is not needed for the import. The OffsetId is always linked to an APEX instance and ensures that the metadata for the Oracle APEX application definition does not collide with other metadata on the instance. This means, that the Offset value should always differ, especially if you are importing the same application (or components) to several workspaces on the same APEX instance. If you set the OffsetId to 0, you need to make sure that you are setting this Offset value – or even better, that APEX generates an appropriate one for you – before the APEX app gets imported. The Offset needs to be a positive integer. You have two procedures and one function in the package wwv_flow_application_install for generating, setting and getting the OffsetId value. They are accessable over the synonym APEX_APPLICATION_INSTALL.
-- Generate a new Offset value before application import
BEGIN
  APEX_APPLICATION_INSTALL.generate_offset;
END;

-- Set the Offset value manually
DECLARE
  l_offset_id NUMBER;
BEGIN
  l_offset_id := DBMS_RANDOM.value(100000000000, 999999999999); -- may cause collisions
  APEX_APPLICATION_INSTALL.set_offset(p_offset => l_offset_id);
END;

-- Get the current Offset value
DECLARE
  l_offset_id NUMBER;
BEGIN
  l_offset_id := APEX_APPLICATION_INSTALL.get_offset;
END;
Filter an Interactive Grid using JavaScript in APEX 22.1
When using an Interactive Grid with big data and mutiple columns, it may be helpful for the user to be able to filter the results on specific values. For this purpose, APEX offers the native filter functionality of the Interactive Grid, where the user can add filter options on single columns. In this case, the filter options must be set one by one.
There are some existing Oracle PL/SQL procedures like APEX_IG.ADD_FILTER which allow adding filter operations on columns on the side of the database background process. However, this requires the APEX page to be rerendered so that the filters can be set. Alternatively, the page items of Faceted Search and Smart Filters have been added to APEX recently, but they can be used (as of APEX 22.1) only in combination of a Classic Report, but neither with an Interactive Grid nor an Interactive Report.
In this blog post, I would like to show how the JavaScript methods “addFilter” and “deleteFilter” of the IG could be used to add several filters at the same time using Dynamic Actions without adding them manually over the “Actions” menu or by rerendering the page. Please note that these methods are not documented on Oracle documentation pages and are therefore not supported. They will be probably subject to change and may not work in the same way for future versions of APEX.
Available operators to use are:
- EQ = Equals
- NEQ = Not Equals
- LT = Less than
- LTE = Less then or equal to
- GT = Greater Than
- GTE = Greater than or equal to
- LIKE = Like operator
- NLIKE = Not Like operator
- N = Null
- NN = Not Null
- C = Contains
- NC = Not Contains
- IN = In Operator
- NIN = Not In Operator
- BETWEEN = Value within a range
- NBETWEEN = Value not within a range
- LAST = Value In The Last (Unit as [MI]nutes, [H]ours, [D]ays, [W]eeks, [M]onths, [Y]ears)
- LAST = Value Not In The Last (Unit as [MI]nutes, [H]ours, [D]ays, [W]eeks, [M]onths, [Y]ears)
- NEXT = Value In The Next (Unit as [MI]nutes, [H]ours, [D]ays, [W]eeks, [M]onths, [Y]ears)
- NNEXT = Value Not In The Next (Unit as [MI]nutes, [H]ours, [D]ays, [W]eeks, [M]onths, [Y]ears)
- REGEXP = Value Matches Regular Expression
- S = Value starts with
- NS = Value does not start with
- OTEXT = Oracle Text Search
The following image shows an example how to use page items for filtering on columns of an Interactive Grid: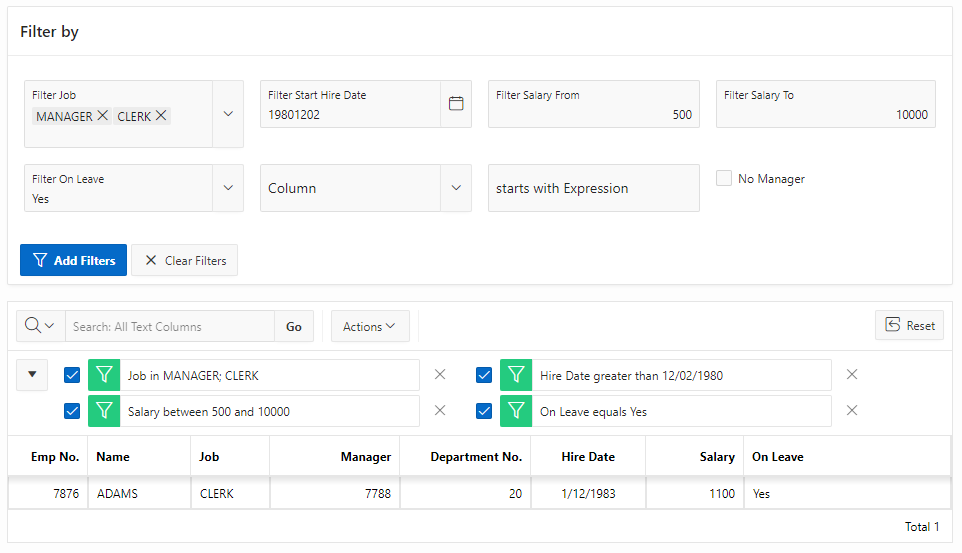
The following JavaScript code used in a Dynamic Action can filter and refresh the columns of the Interactive Grid with region id “employees_ig” shown above. First, all page items are verified and checked whether values have been entered. Some of the characters, like the separator “:” of the page item P1_FILTER_JOB (Popup LOV), need to be replaced by Unicode representations. To be able to use a date value to search for, you may need to convert it to a specific date format like “YYYYMMDD000000” (e.g. 20220902000000). When using the BETWEEN operator, you can combine the values by a tilde (~).
//an array with all filters we want to add when pressing Search
var arrayFields = [];

//counter controller to check whether it should save and refresh IG
var cont = 1;

//adding job filter
if ($v('P1_FILTER_JOB')) {
  var searchStrings = $v('P1_FILTER_JOB').replace(/:/g, '\u0001');
  arrayFields.push(
  {
    type: 'column',
    columnType: 'column',
    columnName: 'Job',
    operator: 'IN',
    value: searchStrings,
    isCaseSensitive: false
  });
}

//adding hire date filter
if ($v('P1_FILTER_HIREDATE')) {
  arrayFields.push(
  {
    type: 'column',
    columnType: 'column',
    columnName: 'Hire Date',
    operator: 'GT',
    value: $v('P1_FILTER_HIREDATE') + '000000',
    isCaseSensitive: false
  });
}

//adding salary filter
if ($v('P1_FILTER_SALARY_FROM') && $v('P1_FILTER_SALARY_TO')) {
  arrayFields.push(
  {
    type: 'column',
    columnType: 'column',
    columnName: 'Salary',
    operator: 'BETWEEN',
    value: $v('P1_FILTER_SALARY_FROM') + '~' + $v('P1_FILTER_SALARY_TO'),
    isCaseSensitive: false
  });
}

//adding on leave filter
if ($v('P1_FILTER_ON_LEAVE')) {
  arrayFields.push(
  {
    type: 'column',
    columnType: 'column',
    columnName: 'On Leave',
    operator: 'EQ',
    value: $v('P1_FILTER_ON_LEAVE'),
    isCaseSensitive: false
  });
}

//adding no manager filter
if ($v('P1_CHECKBOX_NO_MANAGER') == 'Y') {
  arrayFields.push(
  {
    type: 'column',
    columnType: 'column',
    columnName: 'Manager',
    operator: 'N',
    value: 'null',
    isCaseSensitive: false
  } );
}

//adding starts with filter
if ($v('P1_FILTER_STARTS_WITH_COLUMN') && $v('P1_FILTER_STARTS_WITH_EXPRESSION')) {
  arrayFields.push(
  {
    type: 'column',
    columnType: 'column',
    columnName: $v('P1_FILTER_STARTS_WITH_COLUMN'),
    operator: 'S',
    value: $v('P1_FILTER_STARTS_WITH_EXPRESSION'),
    isCaseSensitive: false
  } );
}

//delete all filters
var filters = apex.region('employees_ig').call("getFilters");
for (var i in filters) {
  var filderId = filters[i].id;
  apex.region('employees_ig').call("deleteFilter", filderId);
}

//iterate through the filters and refresh IG
for (var filterObj of arrayFields) {
  if (filterObj.value) {
    apex.region('employees_ig').widget().interactiveGrid("addFilter", filterObj,
    {
      refreshData: (cont == arrayFields.length) ? true : false,
      save: (cont == arrayFields.length) ? true : false
    });
  }
  cont++;
}
PL/SQL: Identify dates of weekdays within time period using NEXT_DAY() function
Today I would like to show an example to demonstrate how you can identify all dates of occurrences of a single weekday within a period of time in PL/SQL by specifying a weekday.
For a project, a form mask in APEX was needed on which the operator should be able to select one or more weekdays (Monday, Tuesday, etc.) within a period of time and specify a time of day and a coach. The aim was to calculate the dates of all selected weekdays between the start and end date with PL/SQL and to store the data in the database table “appointments”. End users can book a support slot on these days via a separate order mask.
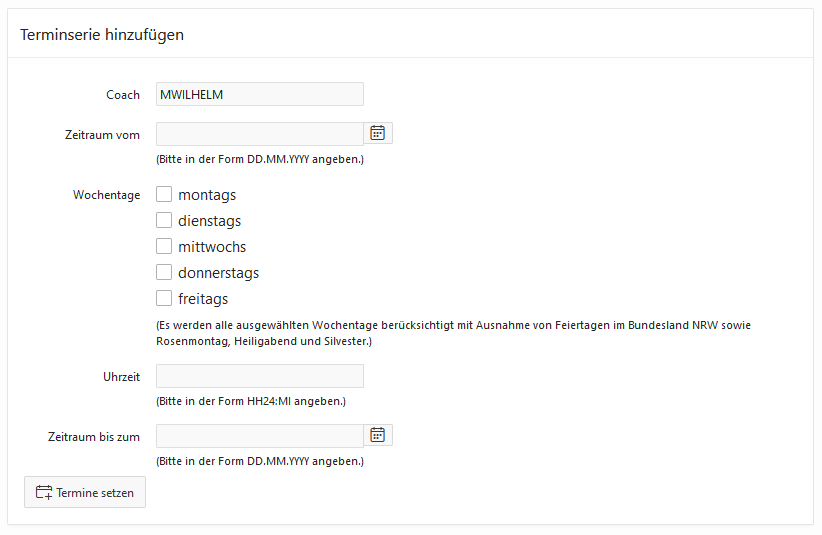
Below you can find the specification and body of the PL/SQL package I have used:
CREATE OR REPLACE PACKAGE booking_dates_pkg AS

  /* Loops through all weekdays and calls procedure save_dates
   *  @param pi_coach specifies the coach name
   *  @param pi_period_from specifies the start date in format DD.MM.YYYY
   *  @param pi_weekdays specifies the colon concatinated numbers of the weekdays, e.g. 0:4 = Monday and Friday
   *  @param pi_period_to specifies the end date in format DD.MM.YYYY
   *  @param pi_period_time specifies the daytime
  */
  PROCEDURE loop_through_weekdays (
    pi_coach         IN VARCHAR2
  , pi_period_from   IN DATE
  , pi_weekdays      IN VARCHAR2
  , pi_period_time   IN VARCHAR2
  , pi_period_to     IN DATE
  );

  /* Identifies each date of a passed weekday within the period
   *  @param pi_coach specifies the coach name
   *  @param pi_period_from specifies the start date in format DD.MM.YYYY
   *  @param pi_weekday specifies the number of the weekday, e.g. 0 = Monday
   *  @param pi_period_to specifies the end date in format DD.MM.YYYY
   *  @param pi_period_time specifies the daytime
  */
  PROCEDURE save_dates (
    pi_coach         IN VARCHAR2
  , pi_period_from   IN DATE
  , pi_weekday       IN NUMBER
  , pi_period_time   IN VARCHAR2
  , pi_period_to     IN DATE
  );

END booking_dates_pkg;
/

CREATE OR REPLACE PACKAGE BODY booking_dates_pkg
AS

  PROCEDURE loop_through_weekdays (
    pi_coach         IN VARCHAR2
  , pi_period_from   IN DATE
  , pi_weekdays      IN VARCHAR2
  , pi_period_time   IN VARCHAR2
  , pi_period_to     IN DATE
  )
  AS
  BEGIN

    FOR i IN (SELECT TO_NUMBER(REGEXP_SUBSTR(pi_weekdays, '[^:]+', 1, LEVEL)) AS day
              FROM dual
              CONNECT BY TO_NUMBER(REGEXP_SUBSTR(pi_weekdays, '[^:]+', 1, LEVEL)) IS NOT NULL)
    LOOP
        save_dates(
	            pi_coach         => pi_coach
			      , pi_period_from   => pi_period_from
			      , pi_weekday       => i.day
			      , pi_period_time   => pi_period_time
			      , pi_period_to     => pi_period_to
        );
    END LOOP;

  END loop_through_weekdays;

  PROCEDURE save_dates (
    pi_coach         IN VARCHAR2
  , pi_period_from   IN DATE
  , pi_weekday       IN NUMBER
  , pi_period_time   IN VARCHAR2
  , pi_period_to     IN DATE
  )
  AS
    l_day DATE;
    l_weekday_name VARCHAR2(30);
    l_period_from_year NUMBER;
    l_period_to_year NUMBER;
    l_count_days NUMBER;
    l_count_holidays NUMBER;
  BEGIN

    l_period_from_year := EXTRACT(year FROM pi_period_from);
    l_period_to_year   := EXTRACT(year FROM pi_period_to);

    /* count all weekdays of a single weekday (e.g. Monday) within the period
     * function next_day() depends of the invoking session's NLS_DATE_LANGUAGE and does not allow the specification of NLS values to make it independent
     * workaround: to make function next_day() independent, use trunc(sysdate, 'IW') to get the first day of week (Monday) defined by ISO standard,
     * and add number of days pi_weekday to identify the name of the selected day of the week uniquely
    */
    l_weekday_name := TO_CHAR(TRUNC(sysdate, 'IW') + pi_weekday, 'Day');

    l_count_days := ( ( NEXT_DAY ( pi_period_to - 7, l_weekday_name )
                        - NEXT_DAY ( pi_period_from - 1, l_weekday_name )
                      ) / 7
                    ) + 1;

     FOR rec_days IN 0..l_count_days-1
     LOOP

          /* identify the weekday (subtract 1 day to include the start date as well) and all following occurrences within the period by calculating weekday+7*rec_days */
          l_day := ( NEXT_DAY ( pi_period_from - 1, l_weekday_name ) + 7 * rec_days );

          SELECT COUNT(holiday_date) INTO l_count_holidays
          FROM TABLE(get_german_holidays(l_period_from_year, l_period_to_year))
          WHERE holiday_date = l_day;

          IF l_count_holidays = 0 THEN
             INSERT INTO appointments(date, booked, coach)
             VALUES (TO_DATE(TO_CHAR(l_day, 'DD.MM.YYYY') || ' ' || pi_period_time, 'DD.MM.YYYY HH24:MI'), 0, pi_coach);
          END IF;

     END LOOP;

  END save_dates;

END booking_dates_pkg;
/
Via the database function NEXT_DAY() the date of the weekday name passed in the second parameter will be returned which follows the specified date. As an example, NEXT_DAY(’23-AUG-2020′, ‘SUNDAY’) would return the following Sunday (August 30, 2020), even though 23 August is also a Sunday.
The parameter for determining the returning day of the week depends on the NLS_DATE_LANGUAGE of the calling session, at the same time the function does not allow the free specification of NLS values. For this reason, calling NEXT_DAY(’23-AUG-2020′, ‘SUNDAY’) may result in the ORA error “ORA-01846: not a valid day of the week” if a different language (English, in the example above) is stored for NLS_DATE_LANGUAGE within the session. To use the function independently and get the weekday name in the language of the session, we use TRUNC(sysdate, ‘IW’) as a workaround to get the first day of the week according to ISO standard (Monday). To identify which weekdays have been selected on the website, colon-separated return values (from 0 (= Monday) to 4 (= Friday)) are passed as varchar from the APEX page to the procedure loop_through_weekdays (e.g. ‘0:1:3’ for Monday, Tuesday and Thursday) that are added on top of Monday. Via TO_CHAR(TRUNC(sysdate, ‘IW’) + pi_weekday, ‘Day’) we get the selected weekday in the correct language of the session. After determining the specific date of the weekday, all following occurrences of this weekday can be identified by simple mathematical multiplications using a FOR loop. In order for the start day to be taken into account, we use NEXT_DAY(〈start date〉-1, 〈weekday name〉) to obtain the date of the day preceding the start date and use this for the calculations. Via the calculation NEXT_DAY( pi_period_from – 1, l_weekday_name ) + 7 * rec_days we get all further occurrences of this weekday with each run of the loop.
Dates of public holidays should not be saved in the database. To check whether a date represents a public holiday, the function get_german_holidays() described in the previous blog post is used at this point.
Related posts:
How to Find the Next Business Day and Add or Subtract N Working Days with SQL (blogs.oracle.com)
Make NEXT_DAY() independent of the invoking session’s NLS_DATE_LANGUAGE (community.oracle.com)
Add optional NLS_DATE_LANGUAGE parameter to NEXT_DAY() (community.oracle.com)